

One of the most important aspects of a mechanical keyboard is the sound. Though that characteristic can be easily ruined if your switches aren’t tuned properly.
In this article, you’ll learn why we lube switches, the numerous types of lubricants available, the instruments needed for the job, and the methods to lubing your switches correctly. You’ll be an expert in no time after reading this guide, and you’ll be able to begin lubing!
Why do we Lube Switches?
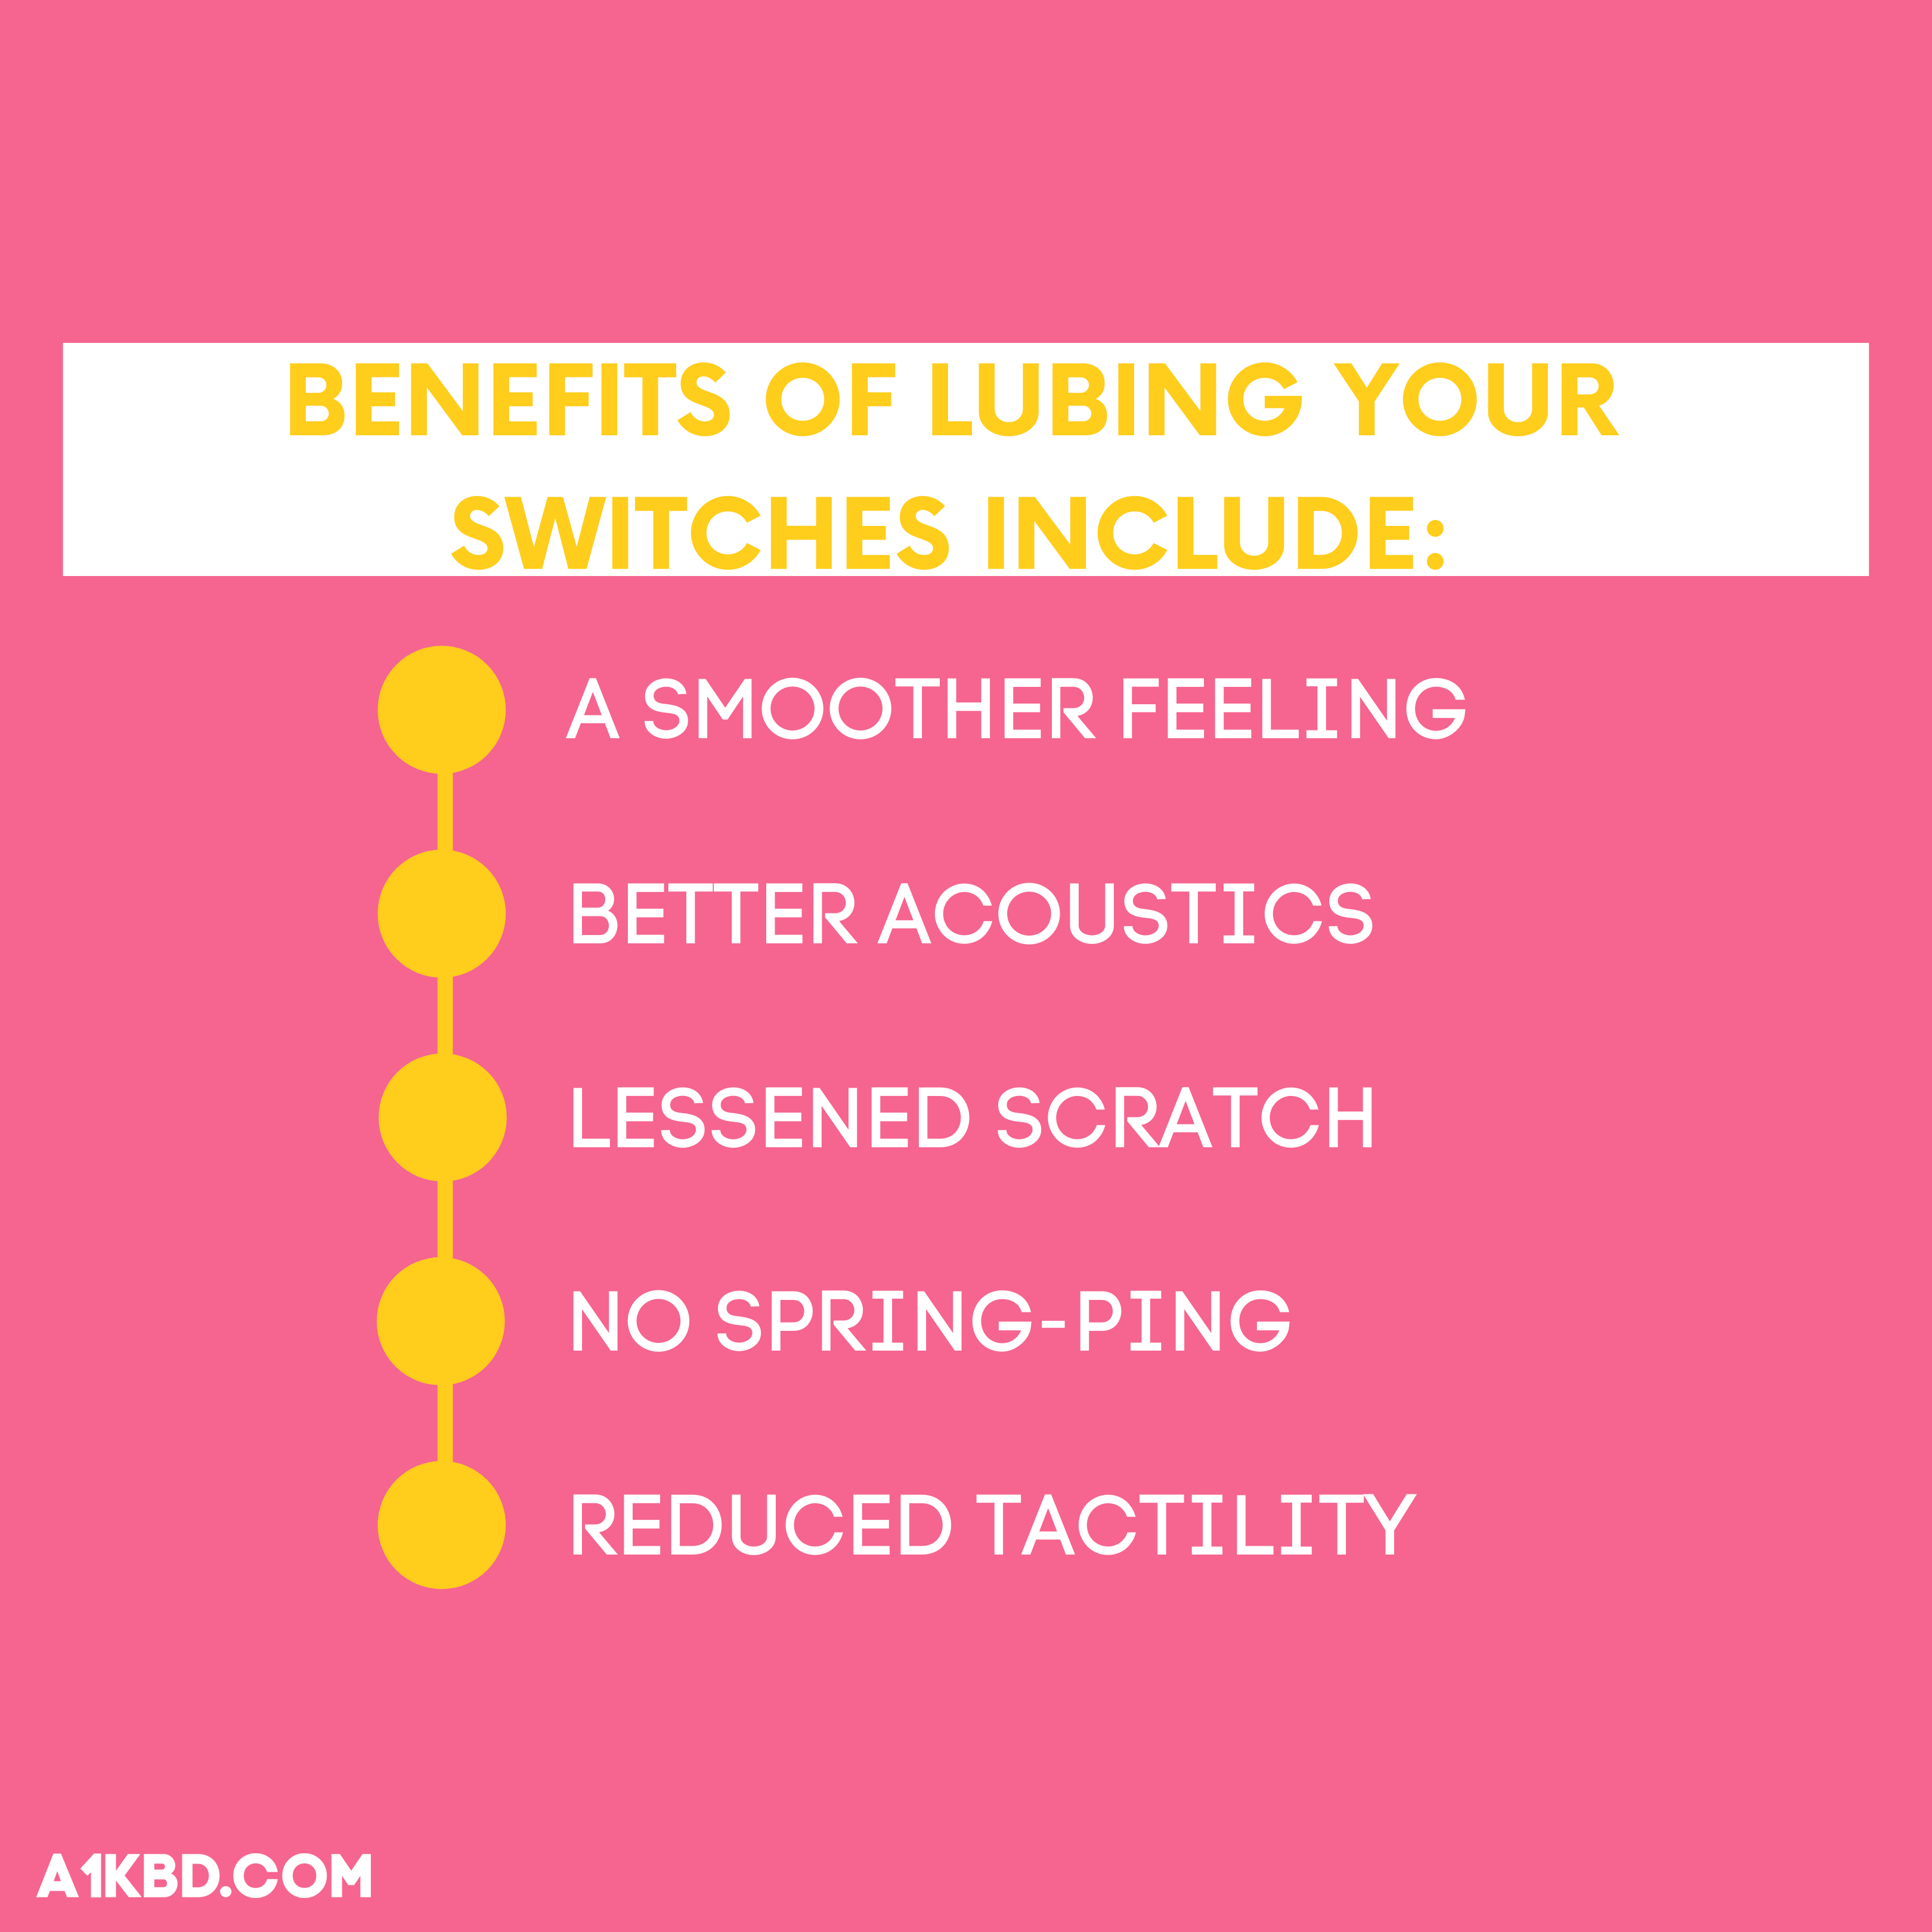
The best way to enhance the sound of your switches is by lubing them. It eliminates unwanted scratchiness and maximizes smoothness. For many keyboard enthusiasts, it’s a must-have to lube their switches. Depending on the material a switch consists of, the smoothness can vary. A mechanical switch has more moving parts than a traditional membrane switch. That noted, moving parts create more points of friction. That is why we use a lubricant to reduce friction which in turn creates a smoother keypress.
Don’t take our word for it! Take a listen for yourself, Here’s a sound comparison of Stock vs Lubed Gateron Milky Yellows.
Obviously, the lubed switches sound much better. The switches became buttery smooth after proper lubrication, as compared to their stock form.
Why you should Lube your Switches
Even though lubing switches is somewhat time-consuming, it takes minimal effort, and the end result will be totally worthwhile since you’ll achieve that premium feeling mechanical keyboard.
Make sure to follow the step-by-step guide very carefully to ensure that you won’t over-lube your switches so they will sound and feel the best they can.
Types of Switch Lube and Preference
Choosing the lube that’s best for you is a very important step toward lubing your switches. With numerous options to select from, it’s critical to know the difference between them. So we’ve tested a plethora of different lubricants on many switches and have boiled it down to the best options for you.
Krytox 205g0
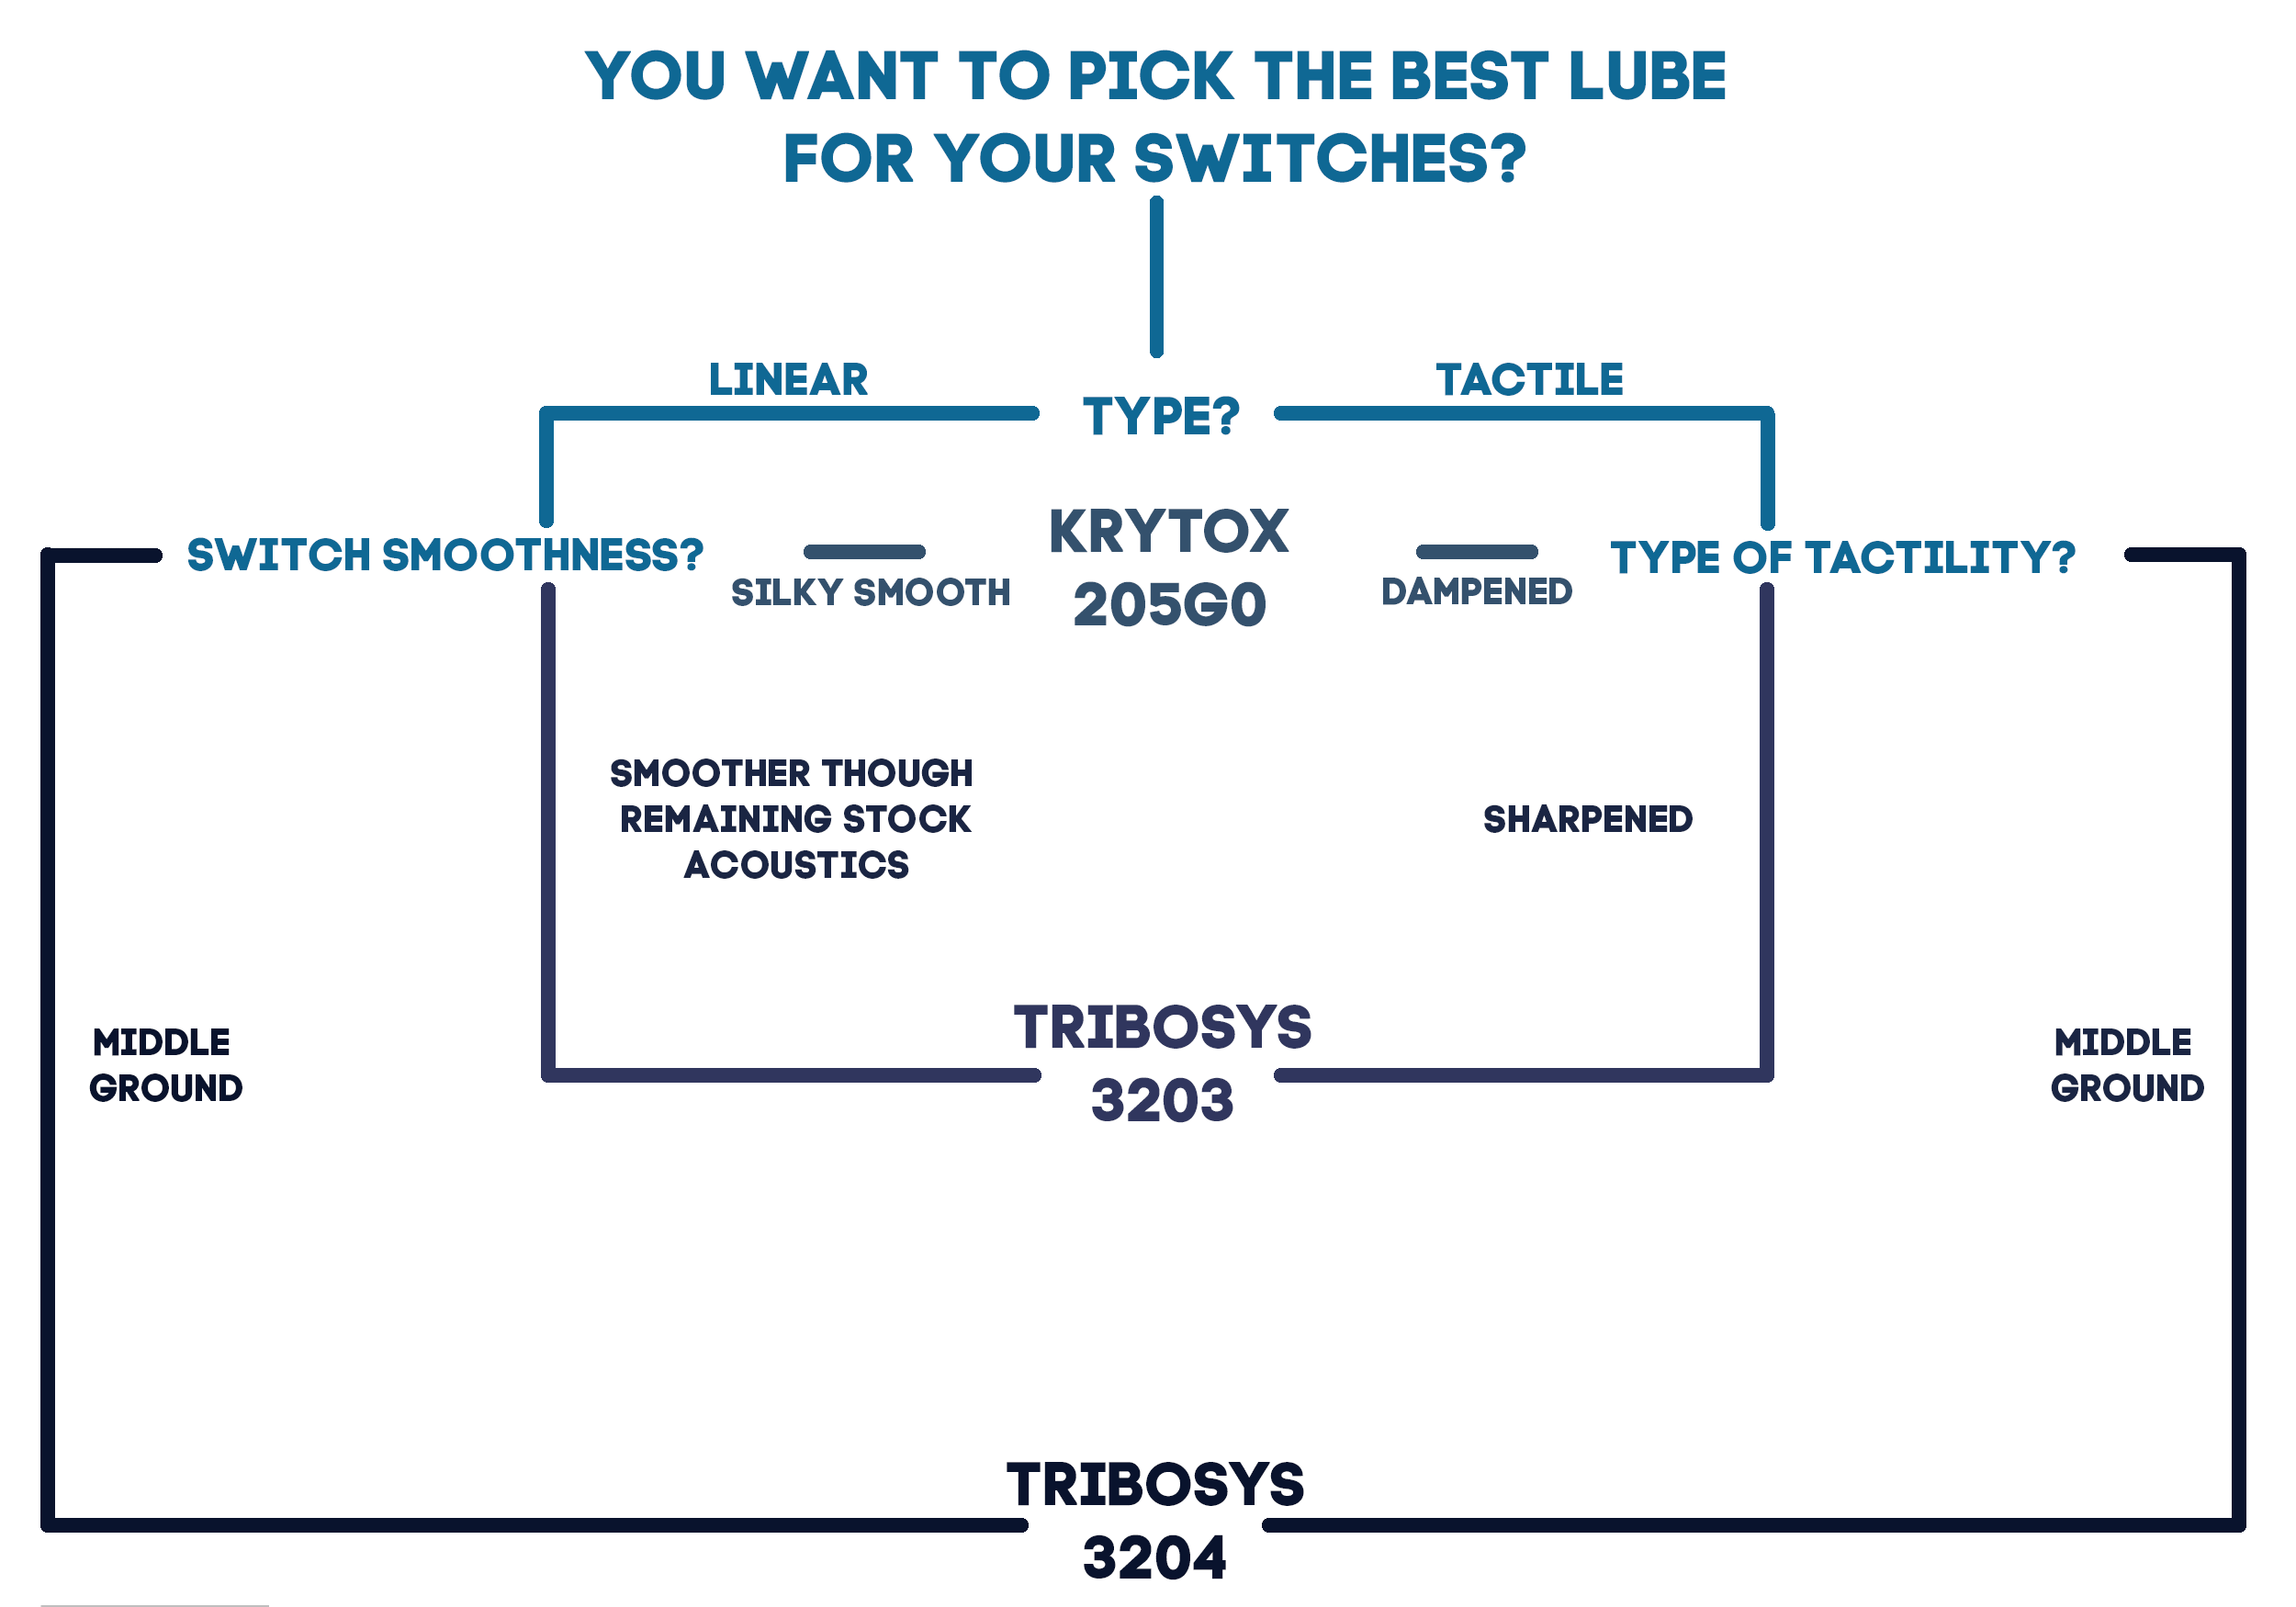
Krytox 205g0 is a thick lubricant that is recommended for linear and tactile switches. It is recommended to be precise when working with this lube due to its high viscosity. The last thing you’d want is to over-lube your switches. Krytox 205g0 provides smoother actuation and a “buttery” feel to linear switches. It can also dampen the tactility of tactile switches while maximizing smoothness.
TriboSys 3204
TriboSys 3204 is a lubricant with medium-high thickness recommended for linear and tactile switches. You can be a bit more generous while applying this lube compared to Krytox 205g0. It provides a smoother keypress while still retaining some stock acoustics. For tactile switches, it is the middle ground between Krytox 205g0 and TriboSys 3203. It reduces scratch though dampens little to no tactility.
TriboSys 3203
TriboSys 3203 is a thin lubricant that is recommended for tactile and in some cases linear switches. This lube lessens errors during application due to its low viscosity. It sharpens the tactility and smoothens the keypress on tactile switches while dampening no tactility. On linear switches, the difference is minimal. If you were to lube a linear switch with TriboSys 3203 there wouldn’t be an audible change, however, it would smoothen the keypress.
Krytox GPL 105 Oil
Krytox GPL 105 is an oil-based lube that is recommended for switch springs. It is primarily used for bag lubing springs to help eliminate spring ping.
It’s important to note, the way your switches feel is a personal preference. Given our best lube picks, if you still aren’t sure which lube to choose, check the image below to help ensure your decision.
9 Tools for Lubing Switches
To properly lube your switches, you’ll need a few tools, just like any other modification. A switch opener, switch lubricant(s), 4 pron stem holder, paintbrush, tweezers, switch puller, and other optional equipment are among the instruments available. We selected the best instruments for you to assure the job is completed correctly.
1. Switch Lubricant
Any switch lubricant mentioned above is a great choice. To solidify your decision, please reference our chart above to obtain the lube that best fits your criteria. However, if you are having a hard time deciding which lube to choose, our go-to option is Krytox 205g0.
2. Switch Opener
A switch opener is highly recommended since it prevents finger strain and reduces the risk of damaging switches. A metal switch opener is exceptionally better over a plastic or 3D printed one since it has more stability.
3. 4-Pron Stem Holder
A stem holder is an important tool used to hold the stems of a switch. It prevents lube from getting on your hands and allows you to lube the stem with precision and no risk of dropping the stem.
4. Paintbrush
A paintbrush with a size of 0 or 00 is recommended for lubing your switches. This allows your placement of the lube to be more consistent and precise.
5. Tweezers
Tweezers will prevent you from getting grease on your fingers while lubing the spring. They are also used for many other modifications surrounding lubing switches.
6. Switch Puller
A switch puller allows you to pull your switches out if you didn’t order them separately. It is also a crucial tool if you own a hot-swappable keyboard.
7. Lube Station (Optional)
A lube station is an optional tool though very helpful for staying organized during the lubing process. It is recommended to get one if you are lubing a large quantity of switches.
8. Resealable Plastic Bag (Optional)
You’ll likely have one of these resealable plastic bags around your household. A plastic bag is utilized to bag-lube your springs if you choose to do so.
9. Switch Films (Optional)
Switch films are a sheet of plastic or other material that goes in-between your top and bottom housing. They reduce stem wobble and improve a switch’s acoustics. Films also enhance the sound consistency of switches. You can check out our full guide about filming switches here.
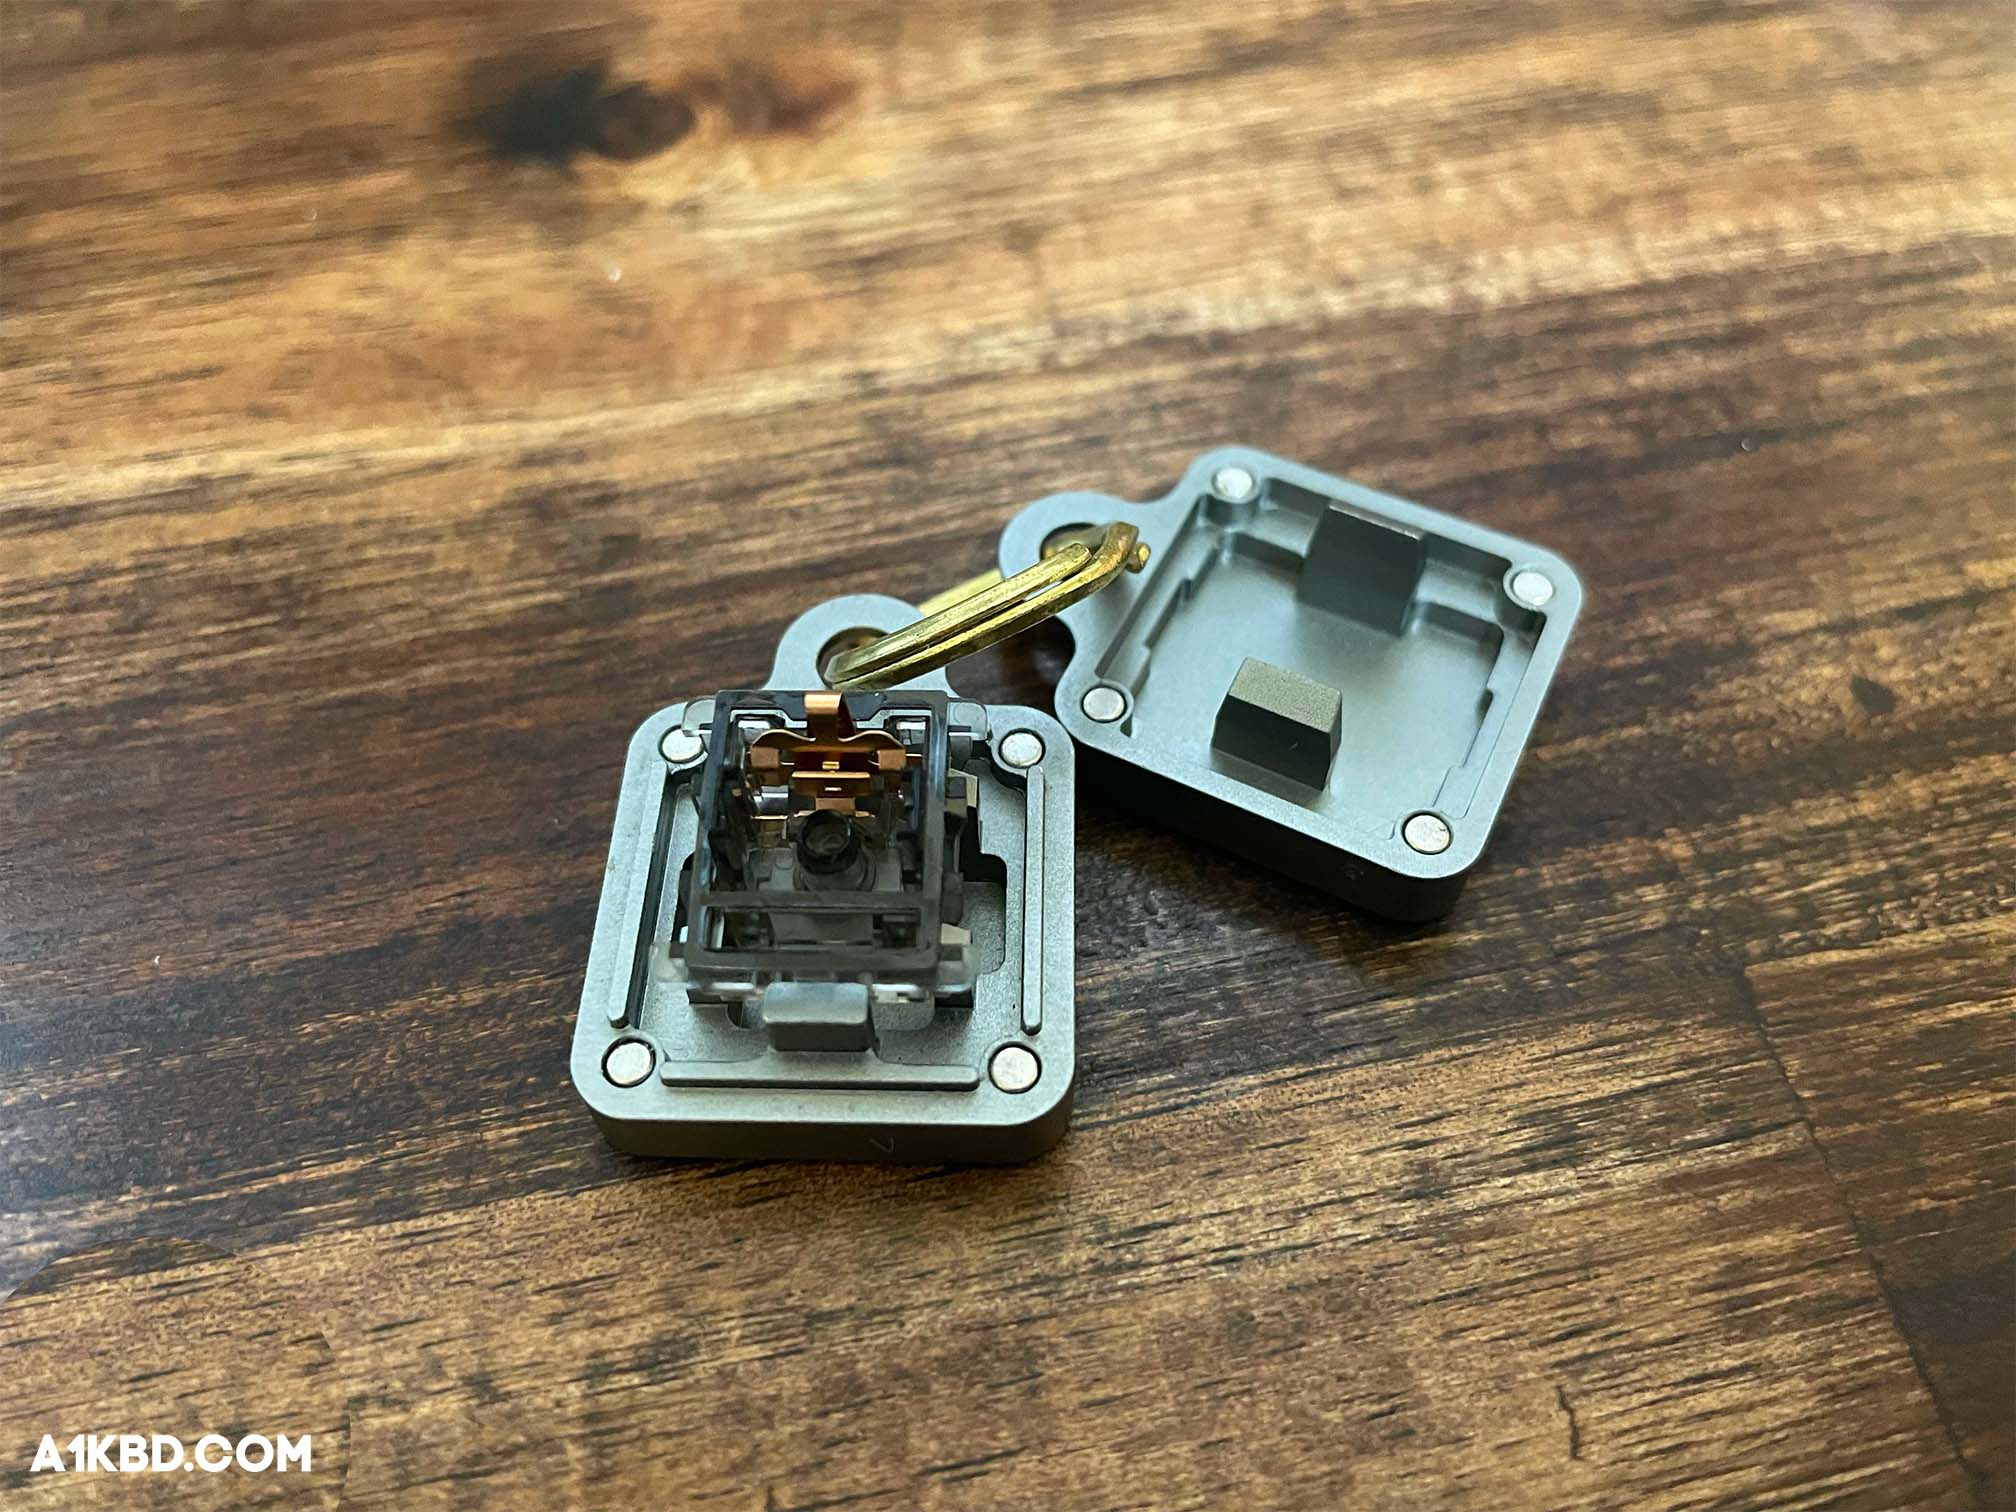
Anatomy of a MX-Style Switch
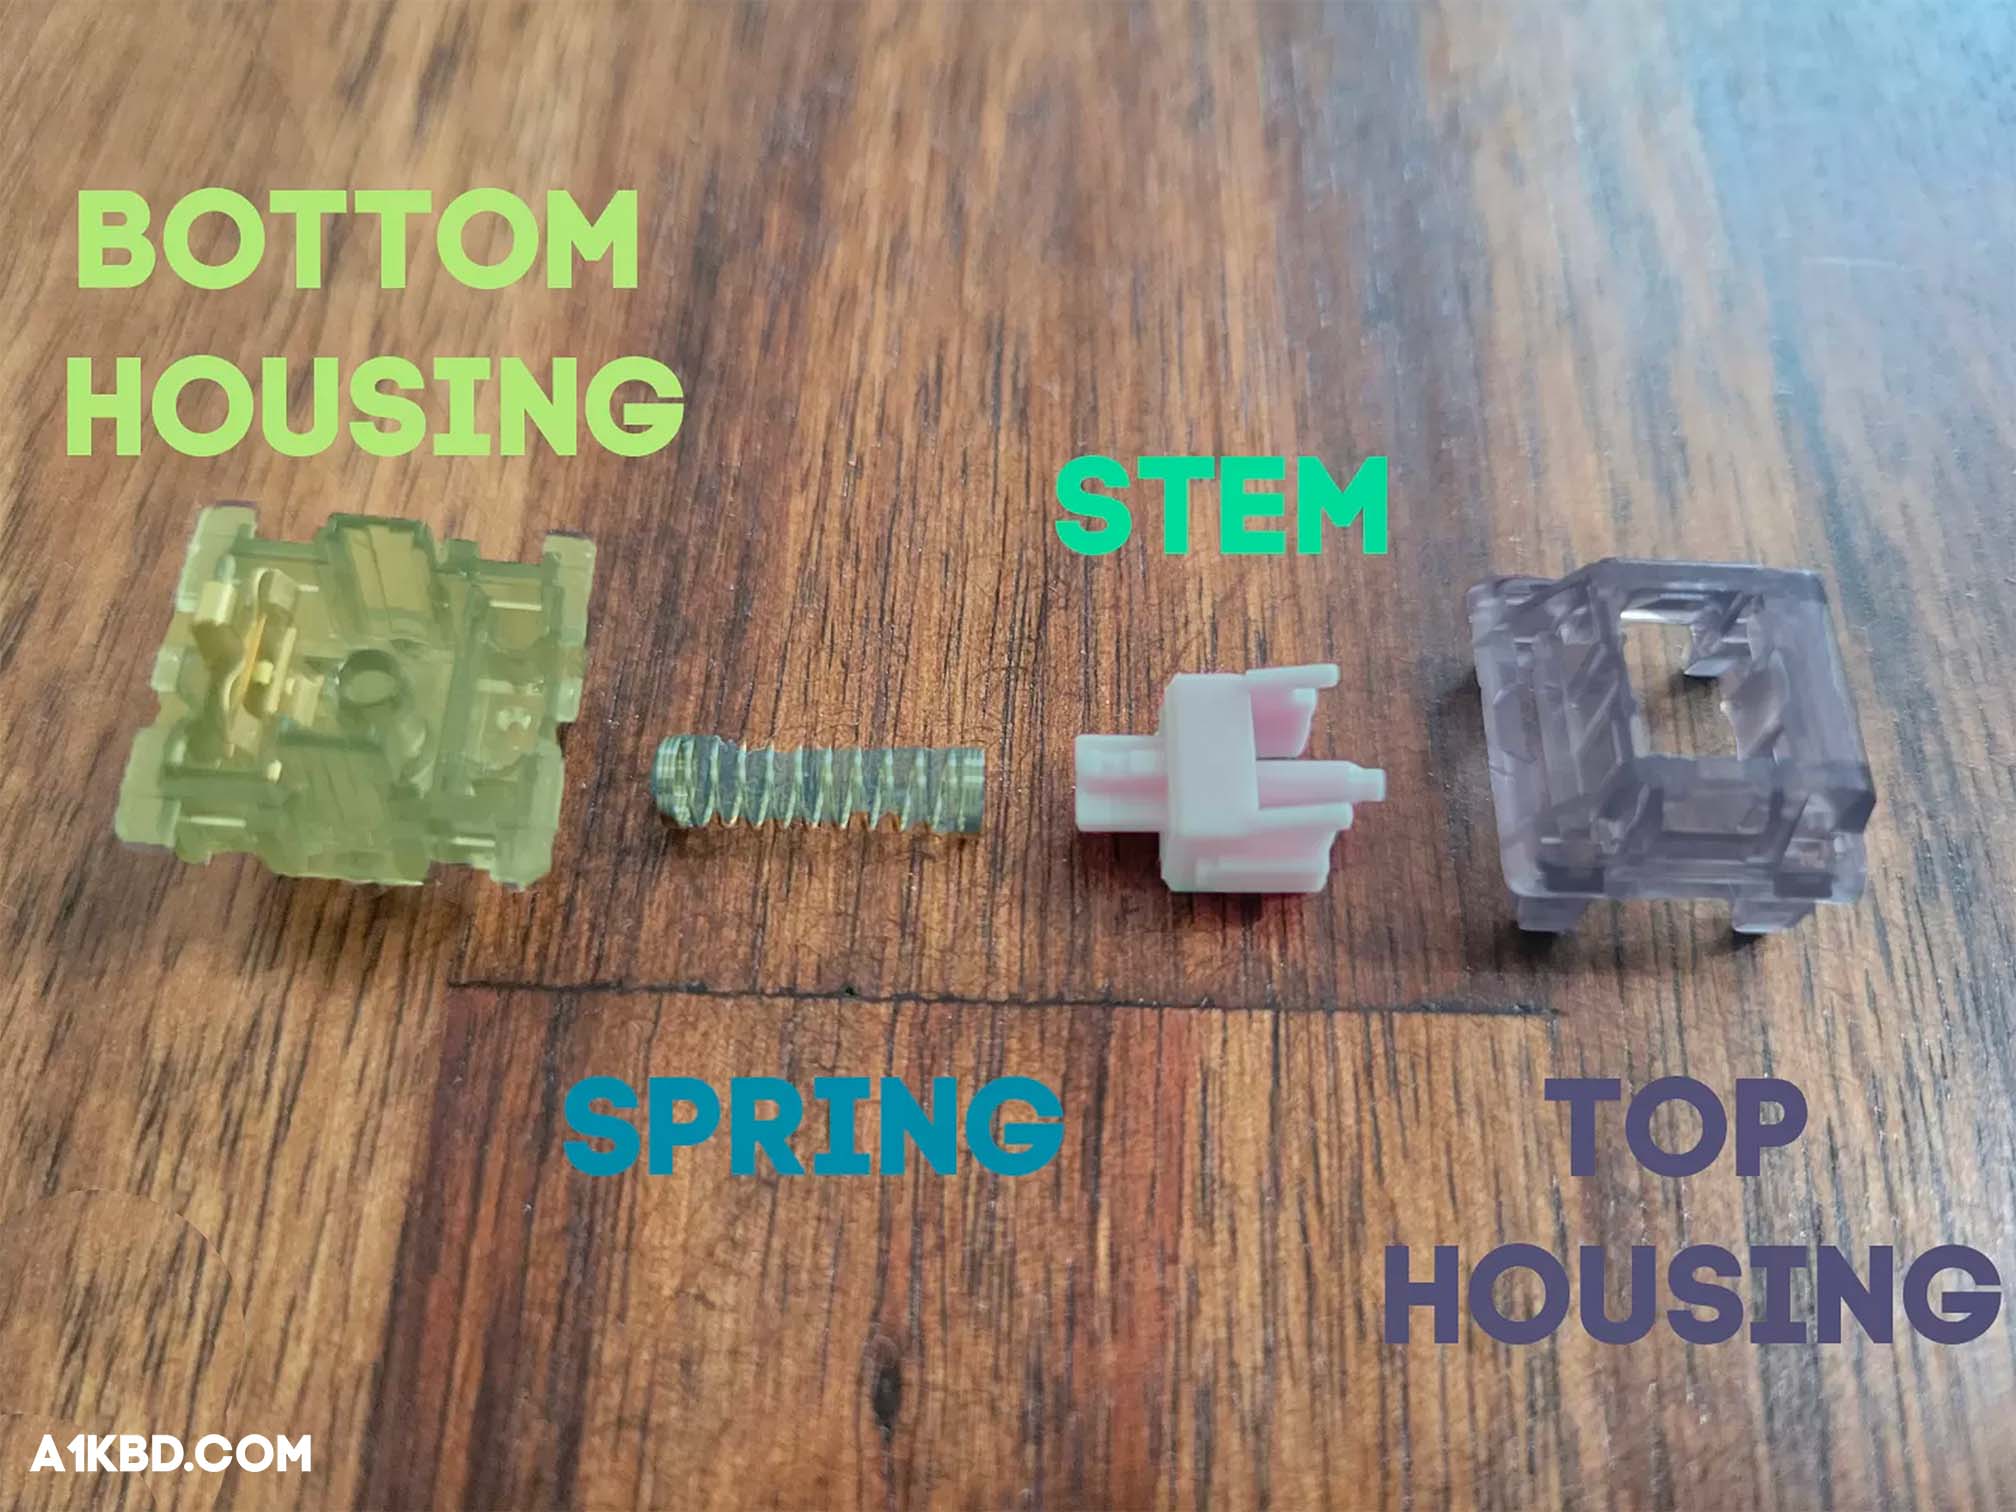
All MX-Style switches have 4 main components. A bottom housing, a top housing, a spring, and a stem. You can reference this labeled image of a switch to have a better idea of what will be highlighted once we dive into the steps to lubing switches.
Correctly Preparing the Brush
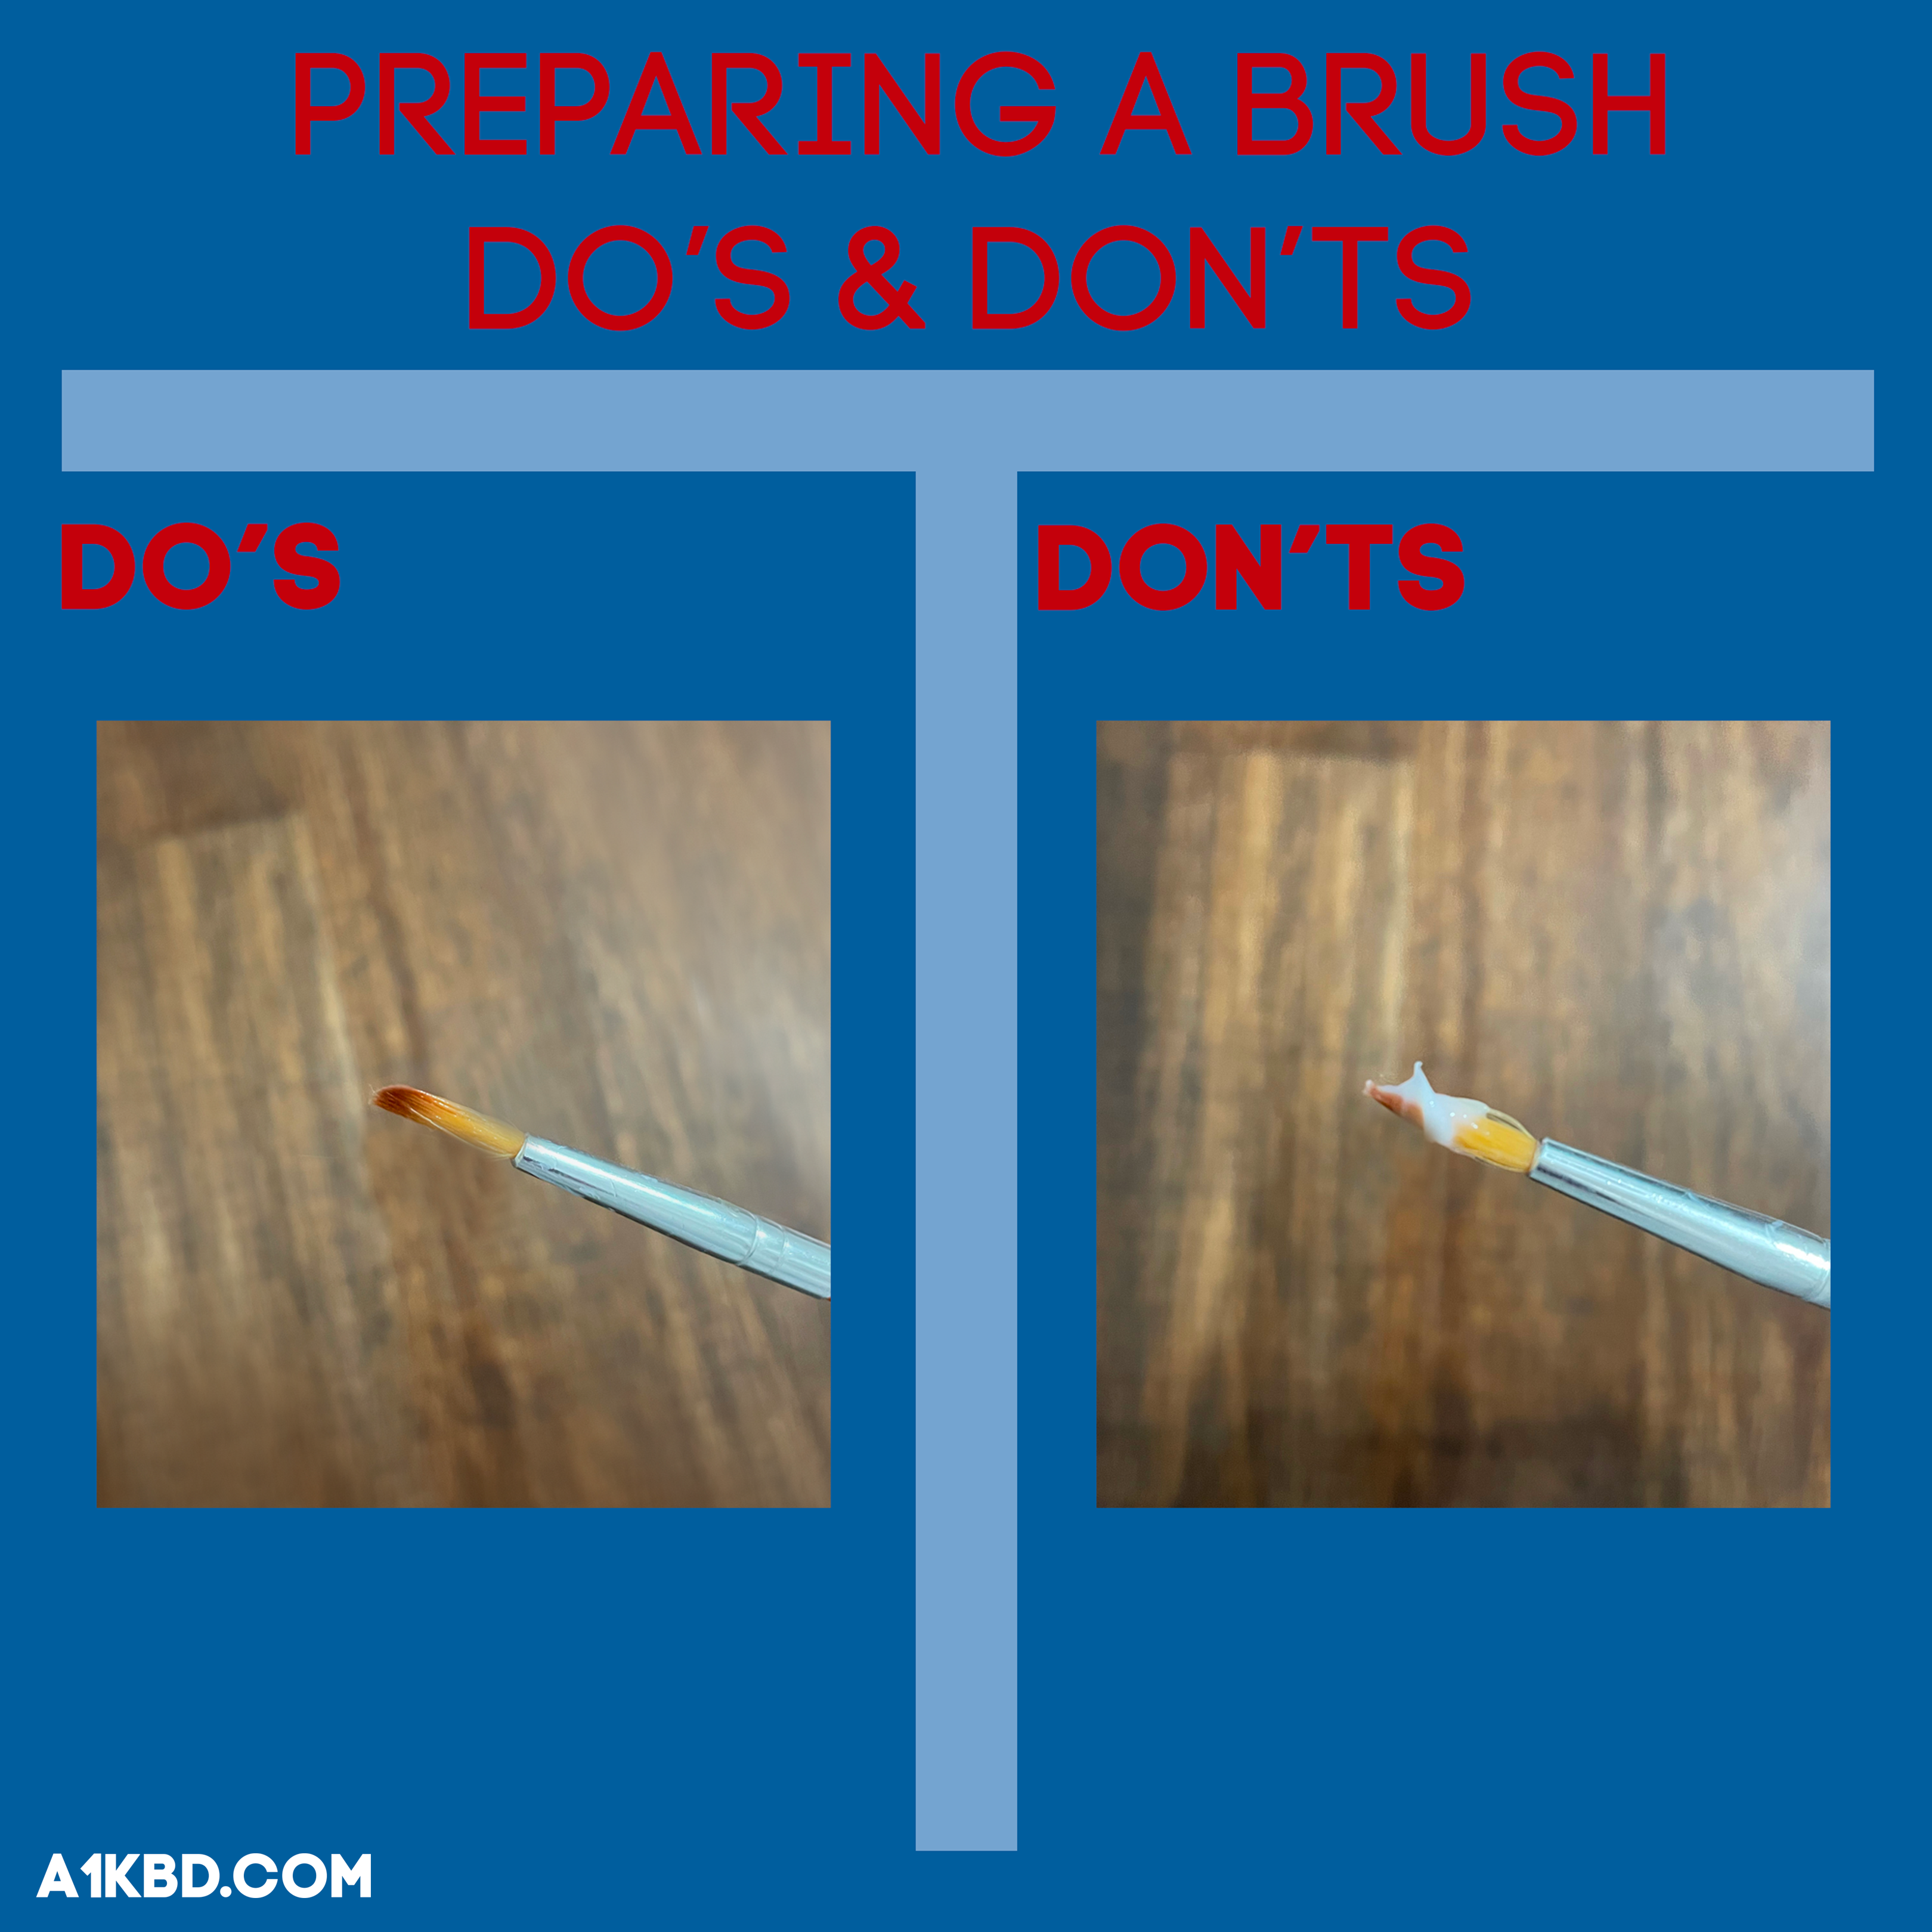
This step may be overlooked by most, but it is vital to know how to correctly load your brush. An over-lubed switch can be worse than its stock form, and the whole point of lubing a switch is to improve its stock foundation. The objective is to have a consistent amount of lube on the brush that can be transferred to the switch.
Usually, there will be lube on the underside of the jar’s cap. It’s best to source your lube from the cap since there is a flat surface to place excess lube on. Start by dabbing the brush into the lube while making sure it coats both sides of the brush. If there are any globs of lube left on the brush, wipe it on the cap. Both sides of the brush should be evenly coated with lubricant. In clear lighting, you should see a visible shine on your brush. This means there is a light coat of lube ready to go onto the switch.
You’ll want to repeat this action every time you replenish the lube on the brush.
9 Steps to Lubing Switches
Without any instruction, lubricating switches is a difficult task. That’s why we developed the 9 most effective steps for lubricating your switches. These steps are simple to follow, and your switches will be properly lubed in no time.
Step #1. Remove the Switches from your Keyboard
To lube your switches, they’ll have to be loose so you can open them up. It is not recommended to lube your switches while they’re still on the keyboard. Lubing switches that are resting on your keyboard risks damaging the PCB and switches. Also, you wouldn’t be able to lube the entire switch, so scratch and spring-ping would still remain. Moreover, it would defeat the whole purpose of lubing switches.
If you own a hot-swappable keyboard, removing your switches is very simple. All you need is a switch puller to plop them out. However, if your switches are soldered into the PCB, then you’ll have to de-solder them with a desoldering gun.
Step #2. Pull the Switches Apart
Required tools: Switch Opener, Four Bowls (Optional)
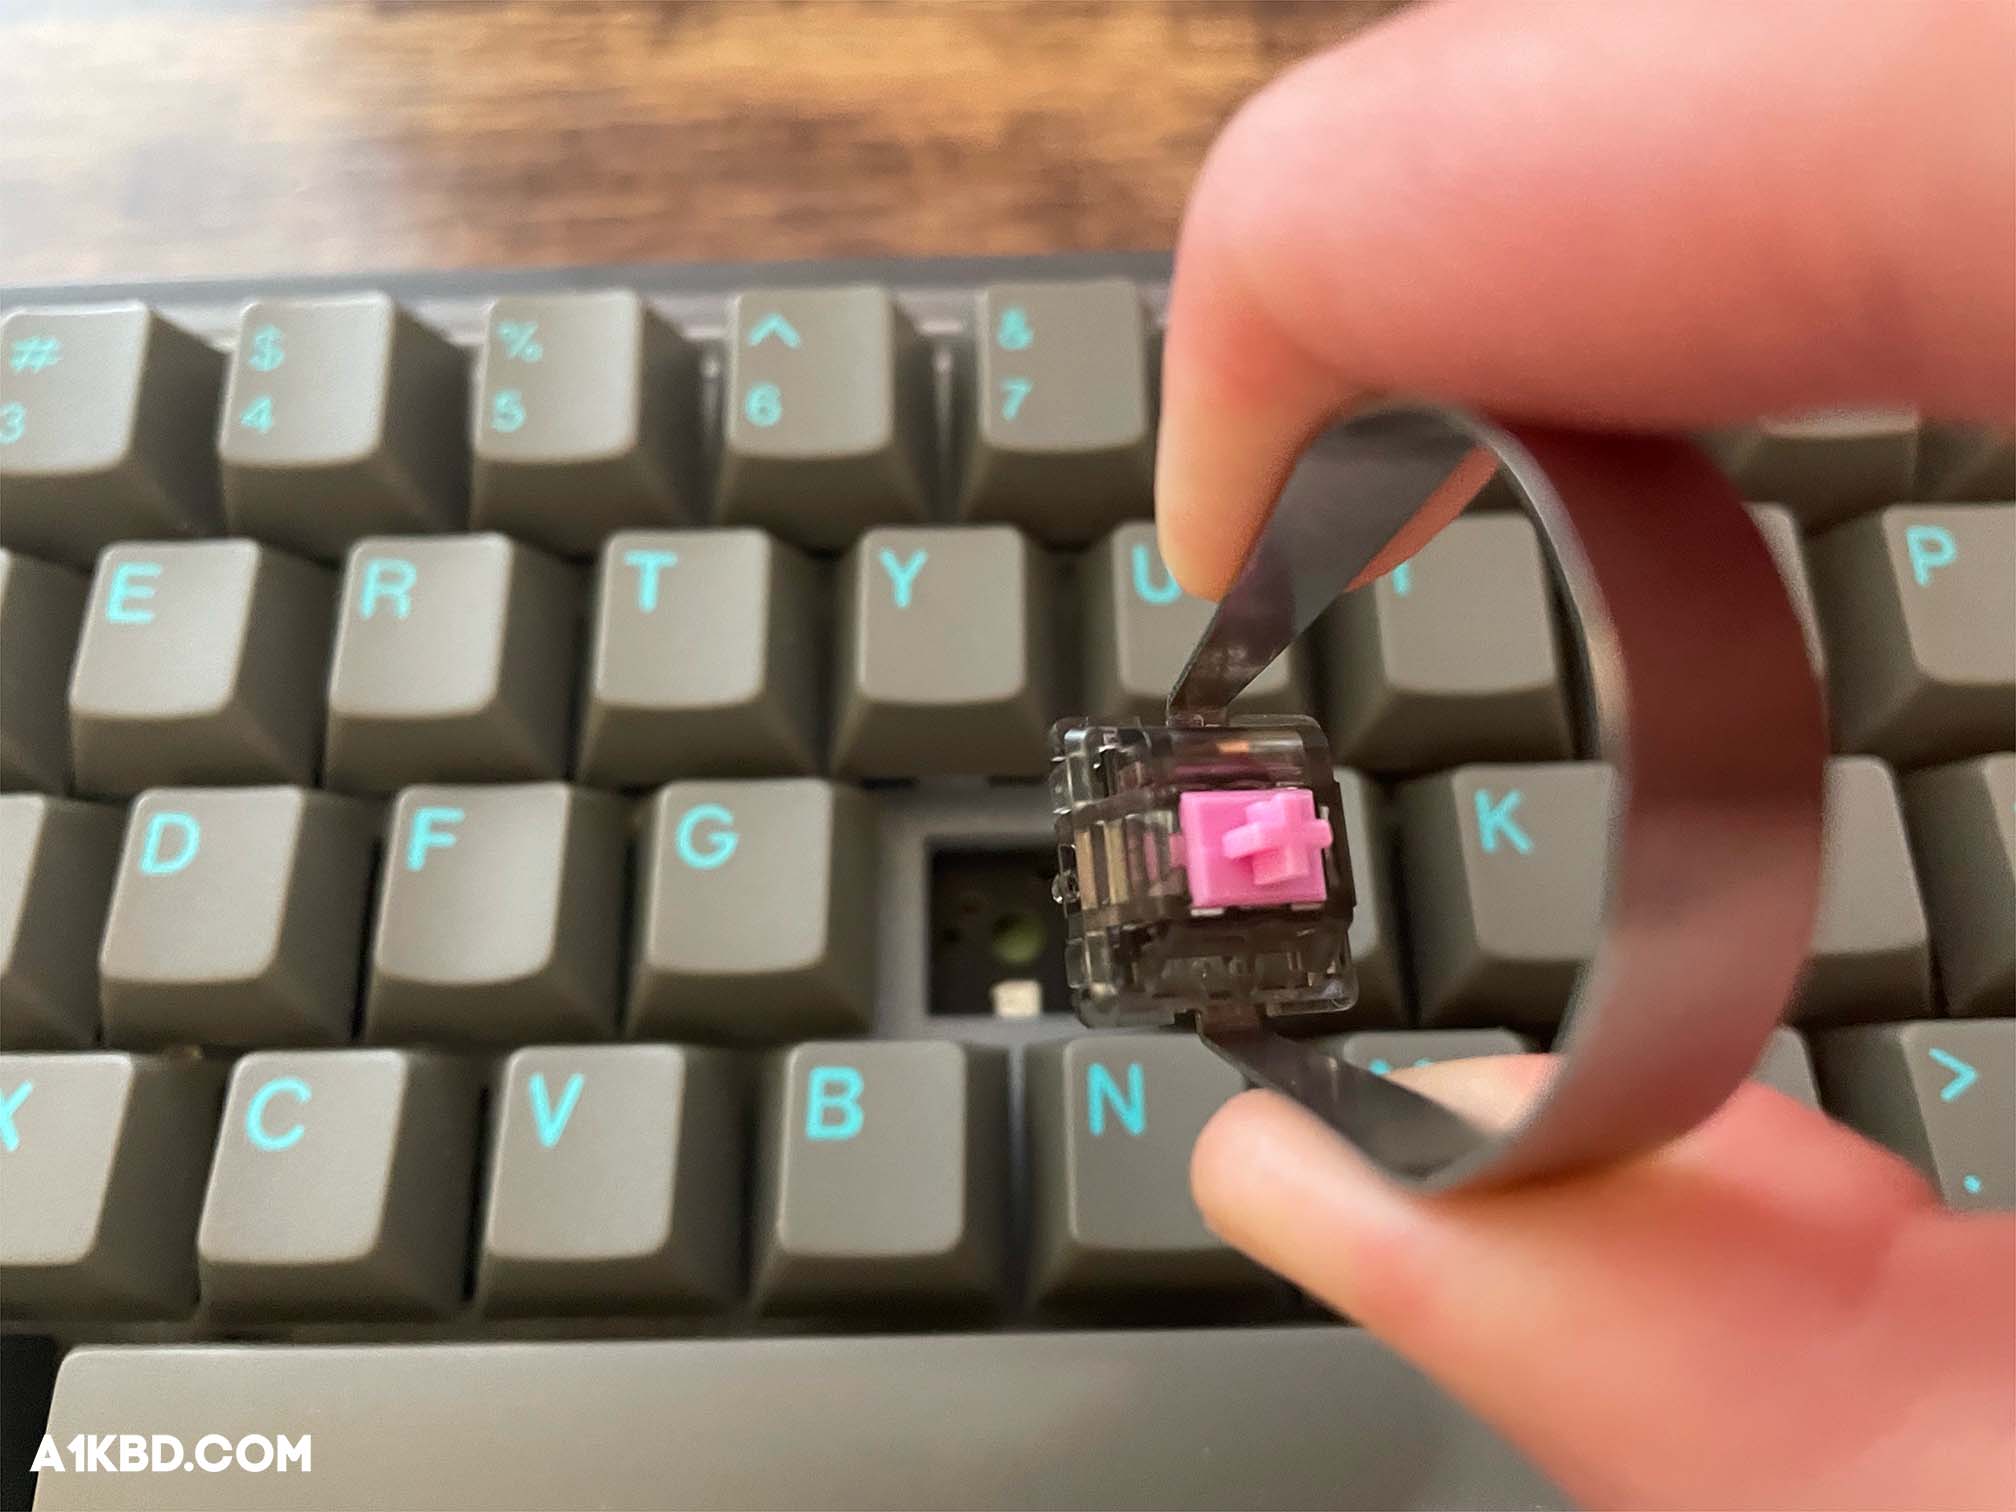
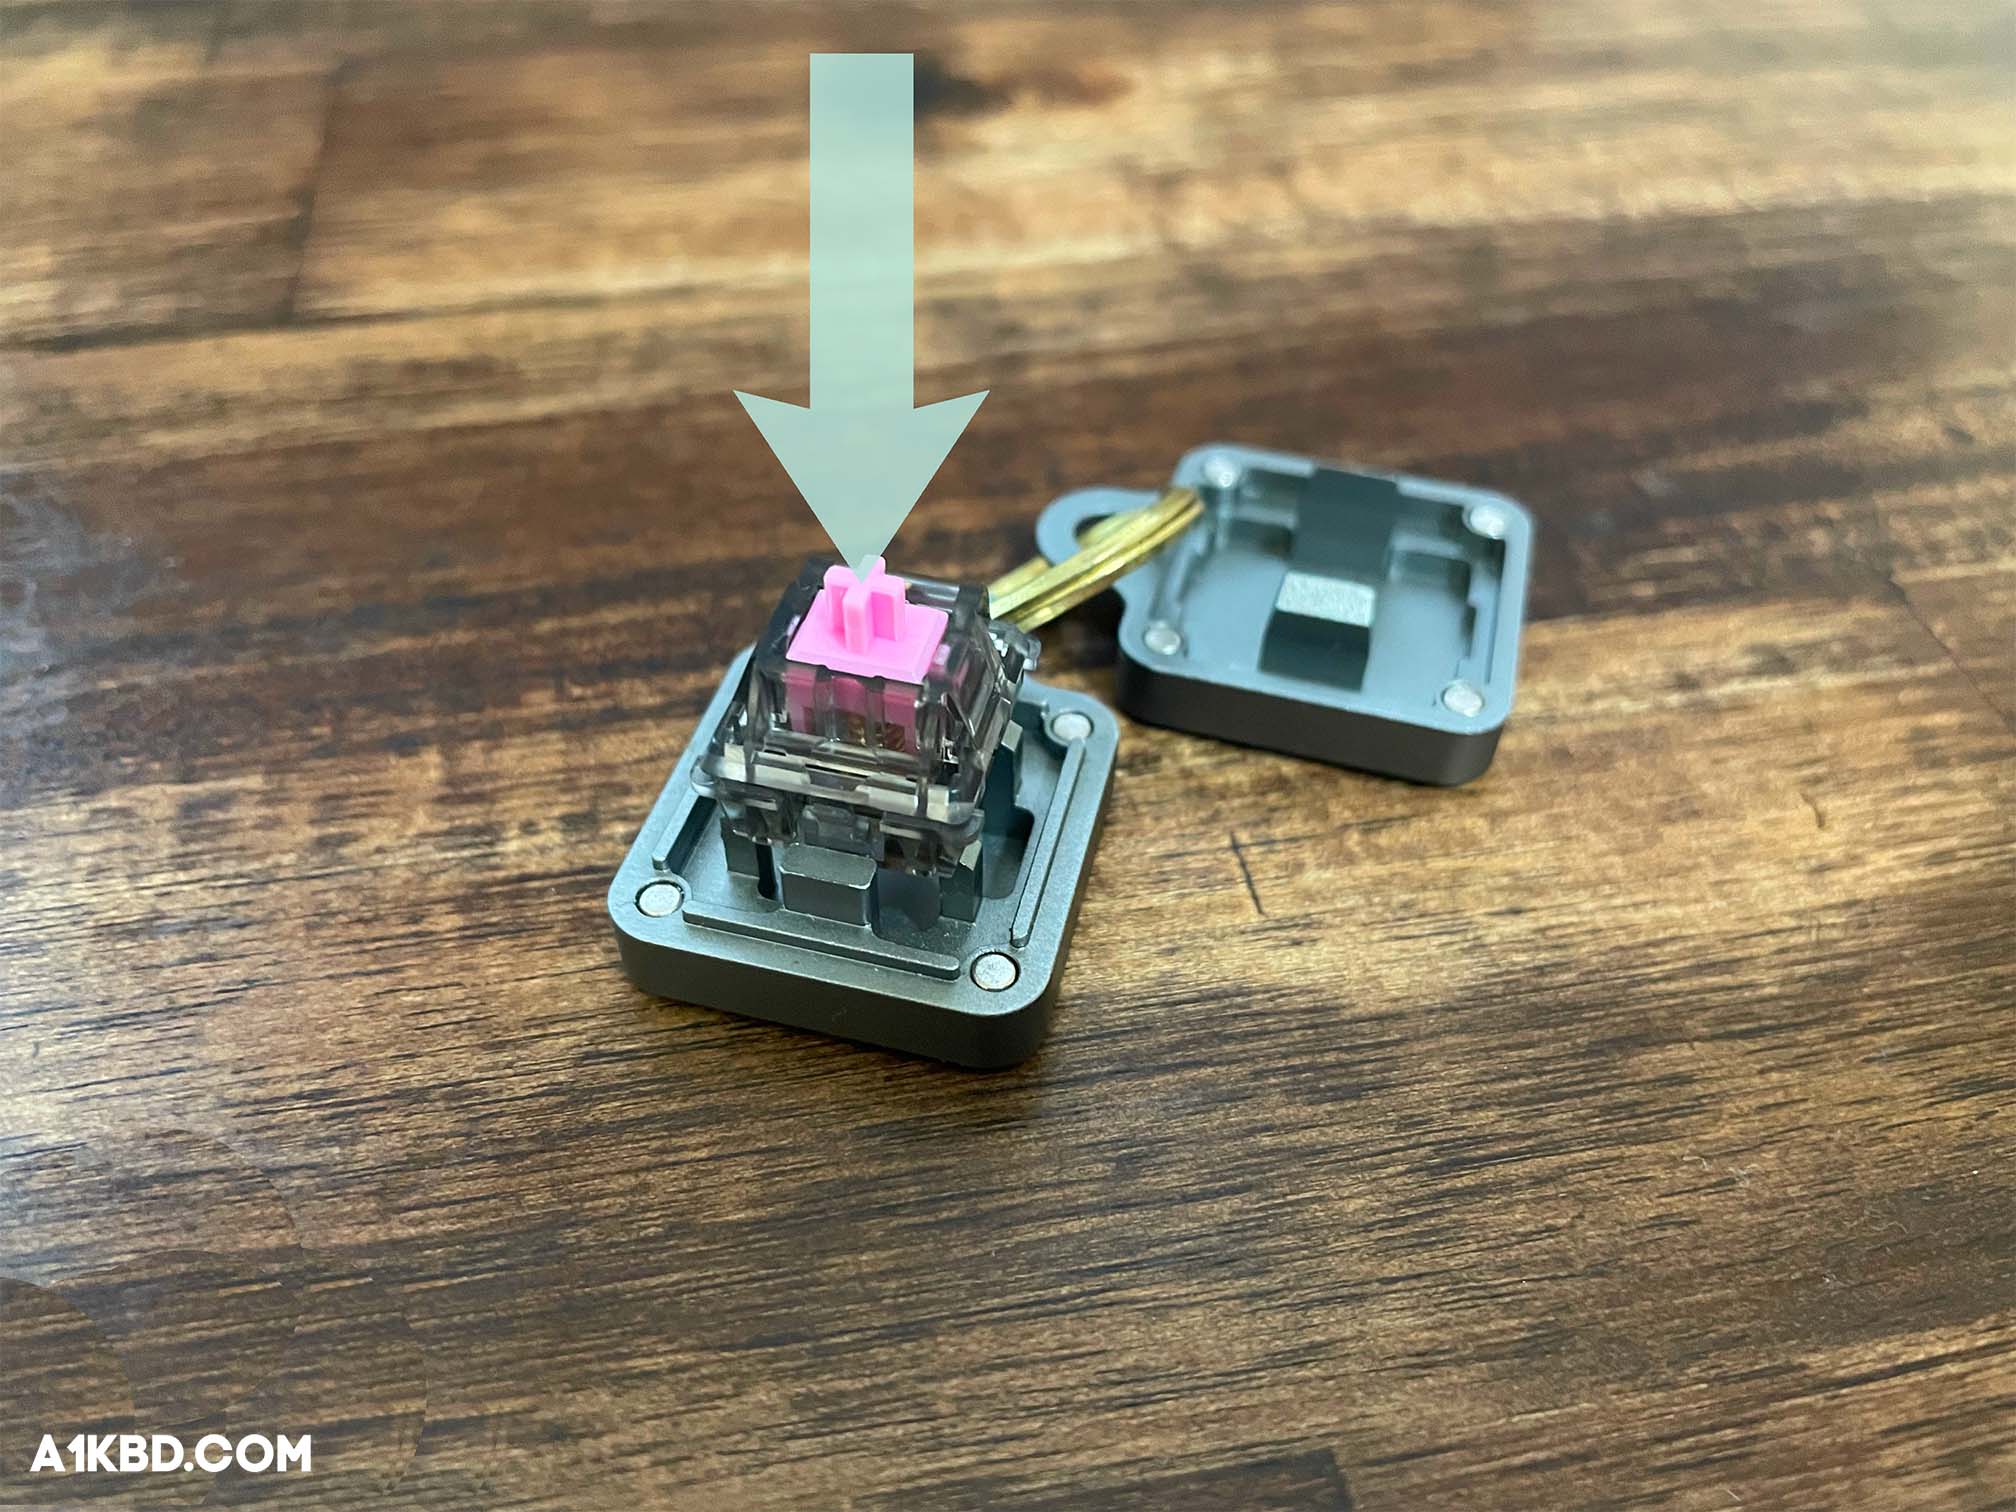
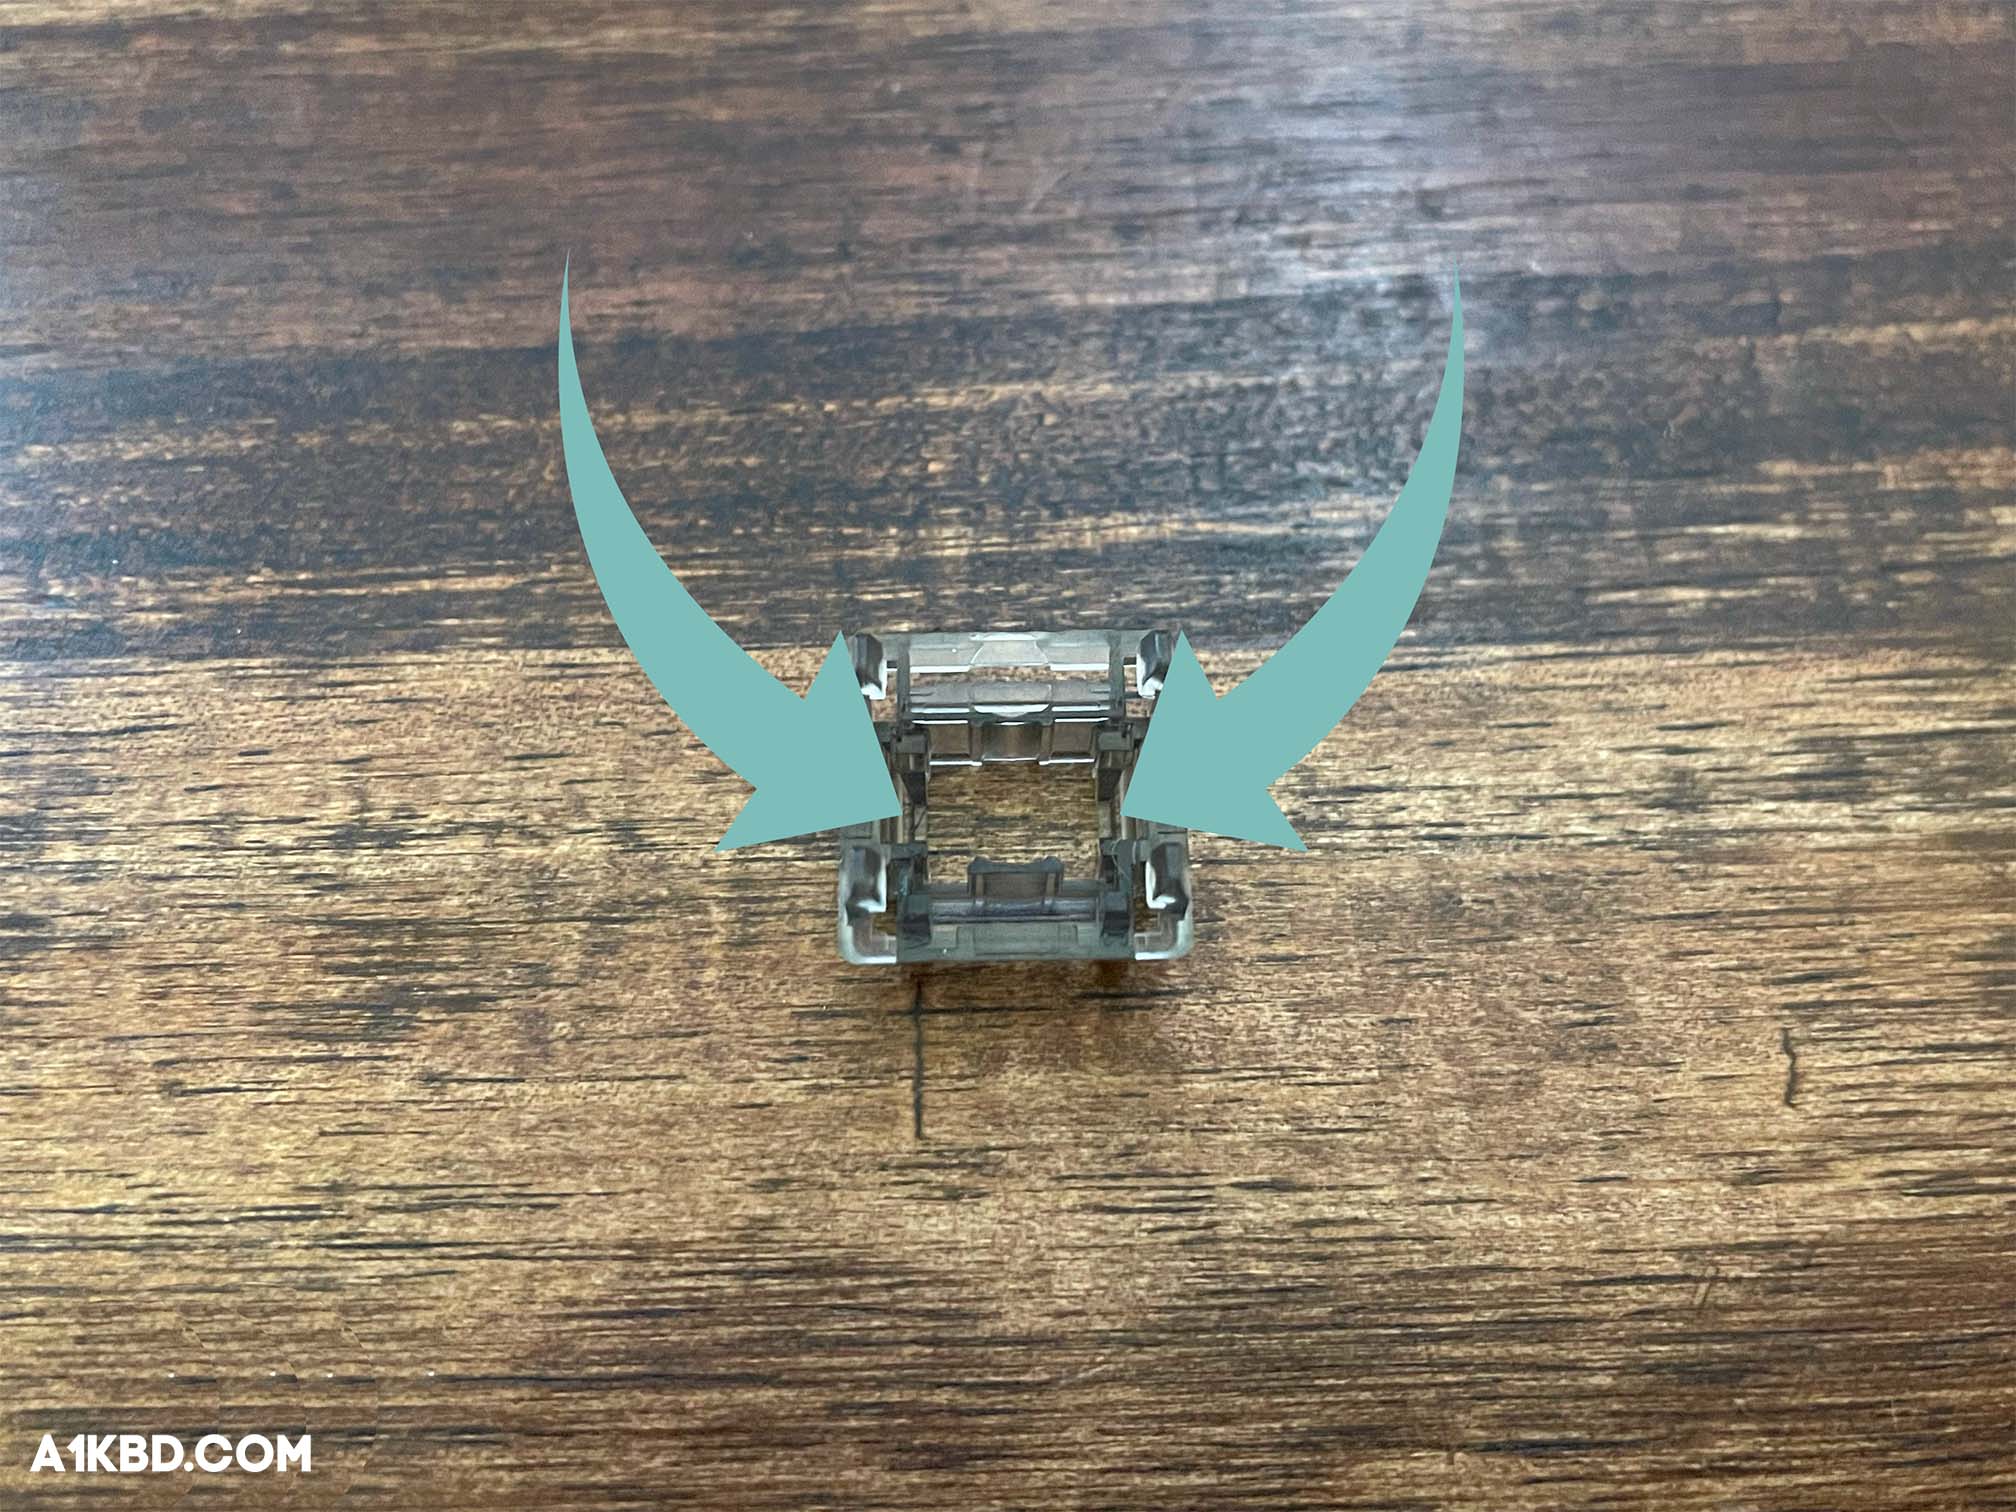
It’s time to open up your switches so we can begin the lubing. For this step, you’ll need your switch opener. Looking at the switch, we can see two tabs on either side. Line those tabs up with the corresponding bars on the switch opener. Push down on the stem of your switch until you hear a *click*. The bars will push the tabs up causing the switch to pop open. Be careful not to apply too much force so you don’t break your switch.
It is best to sort the individual parts of the switch into four different bowls to stay organized. If you have a lube station, you can place the disassembled switches in their respective spots. Either way, staying organized while lubing your switches is key.
Step #3. Lube the Bottom Housing
Required Tools: Lubricant, Brush
Dab your brush into the lube jar.
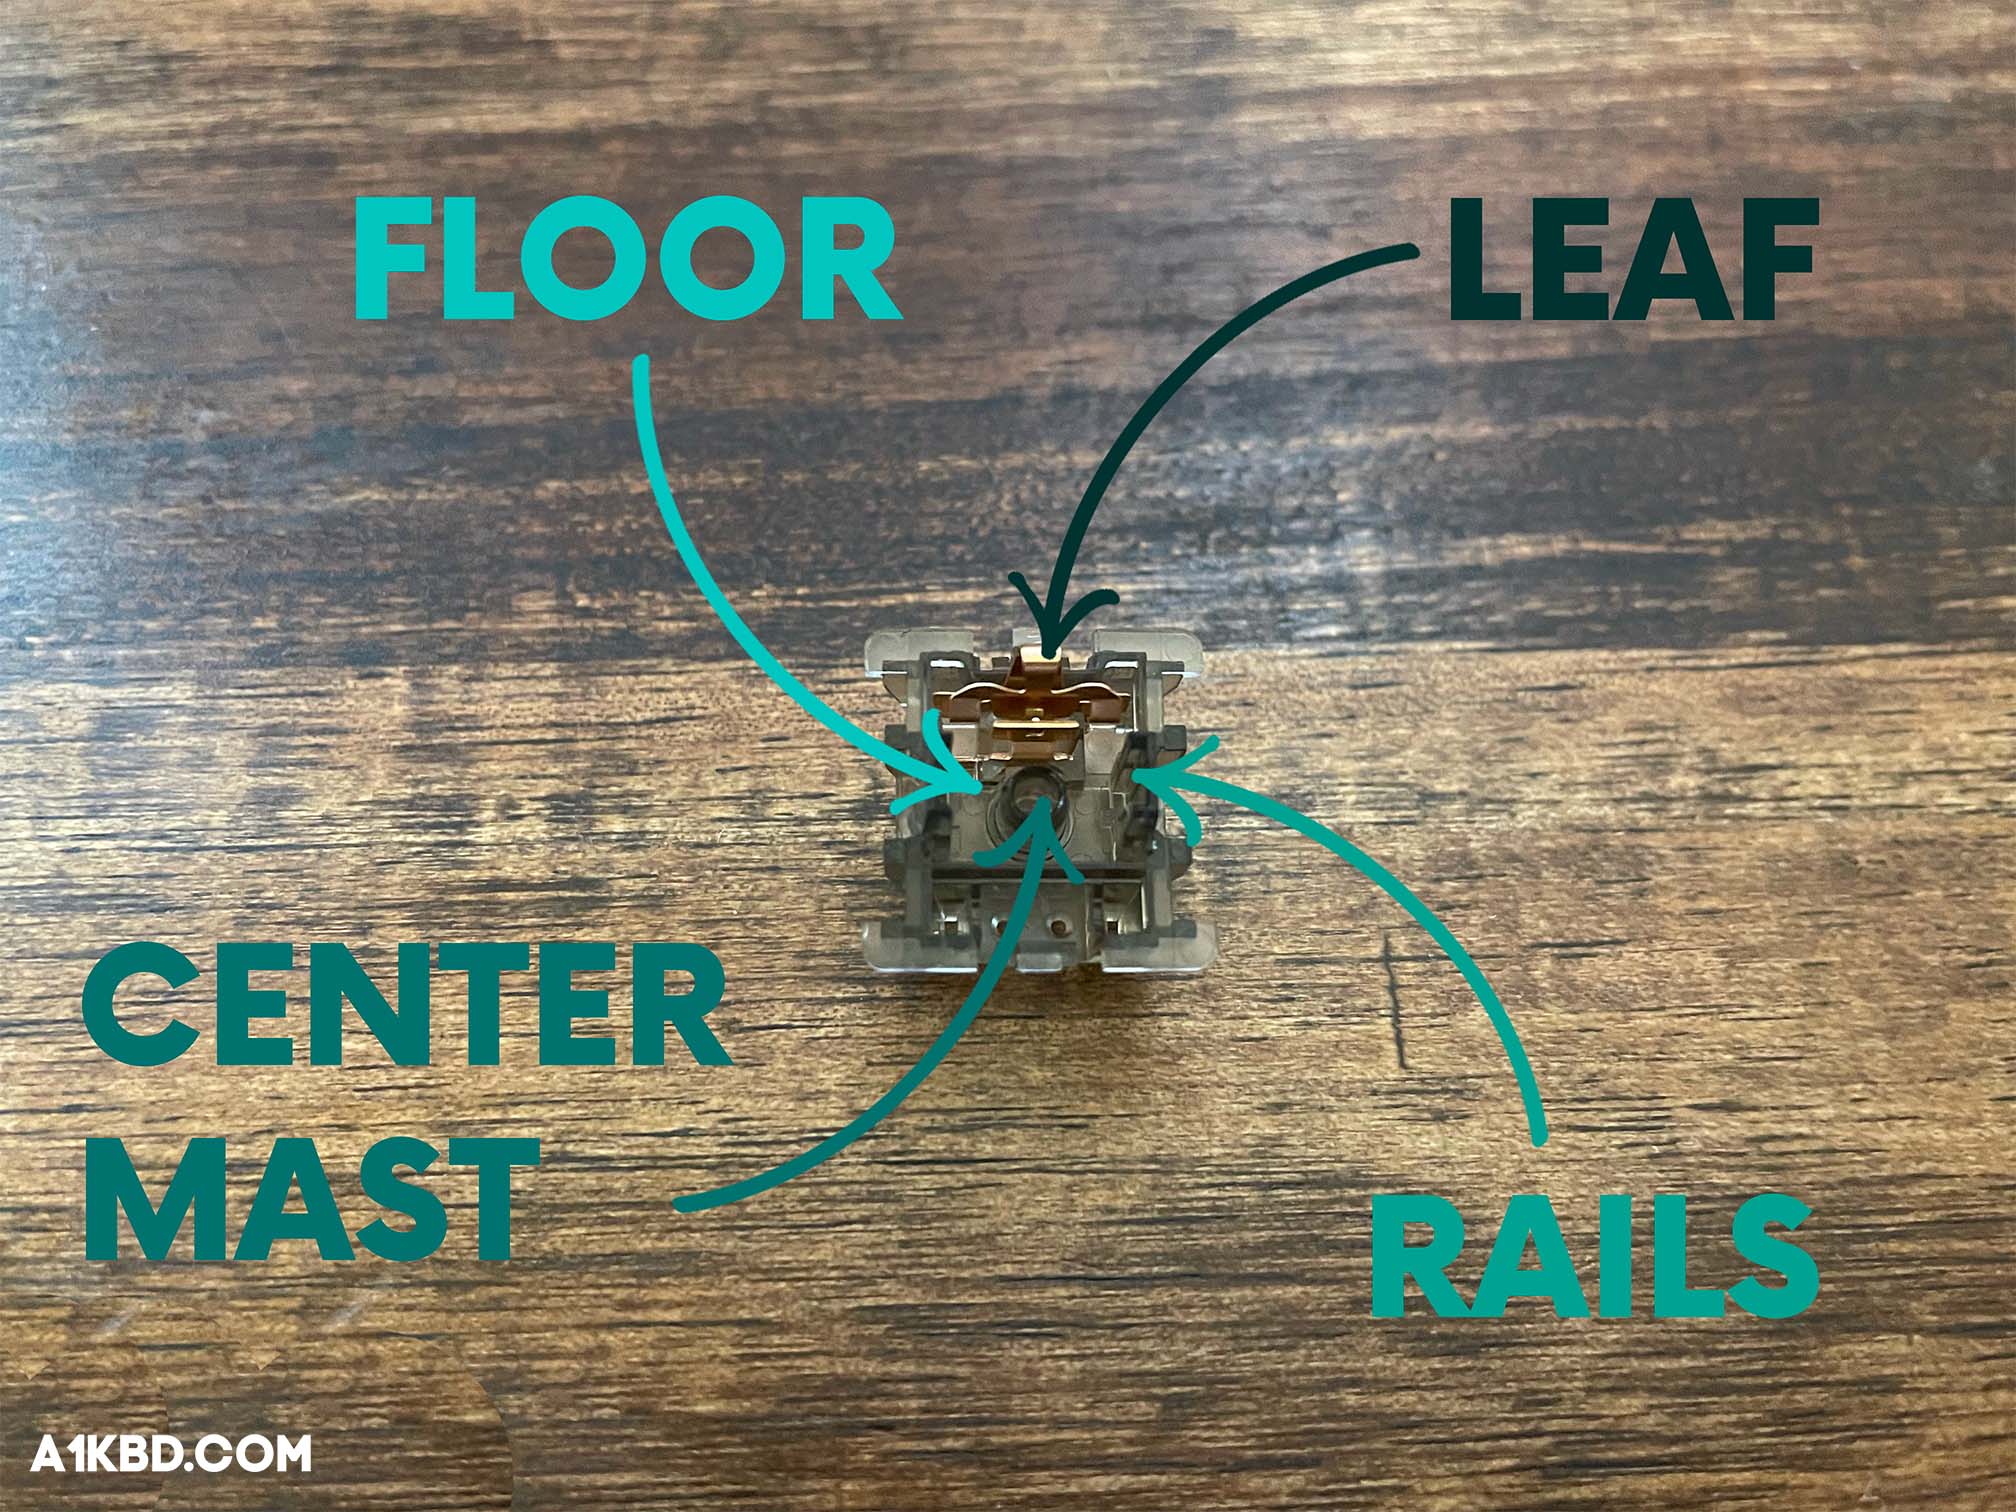
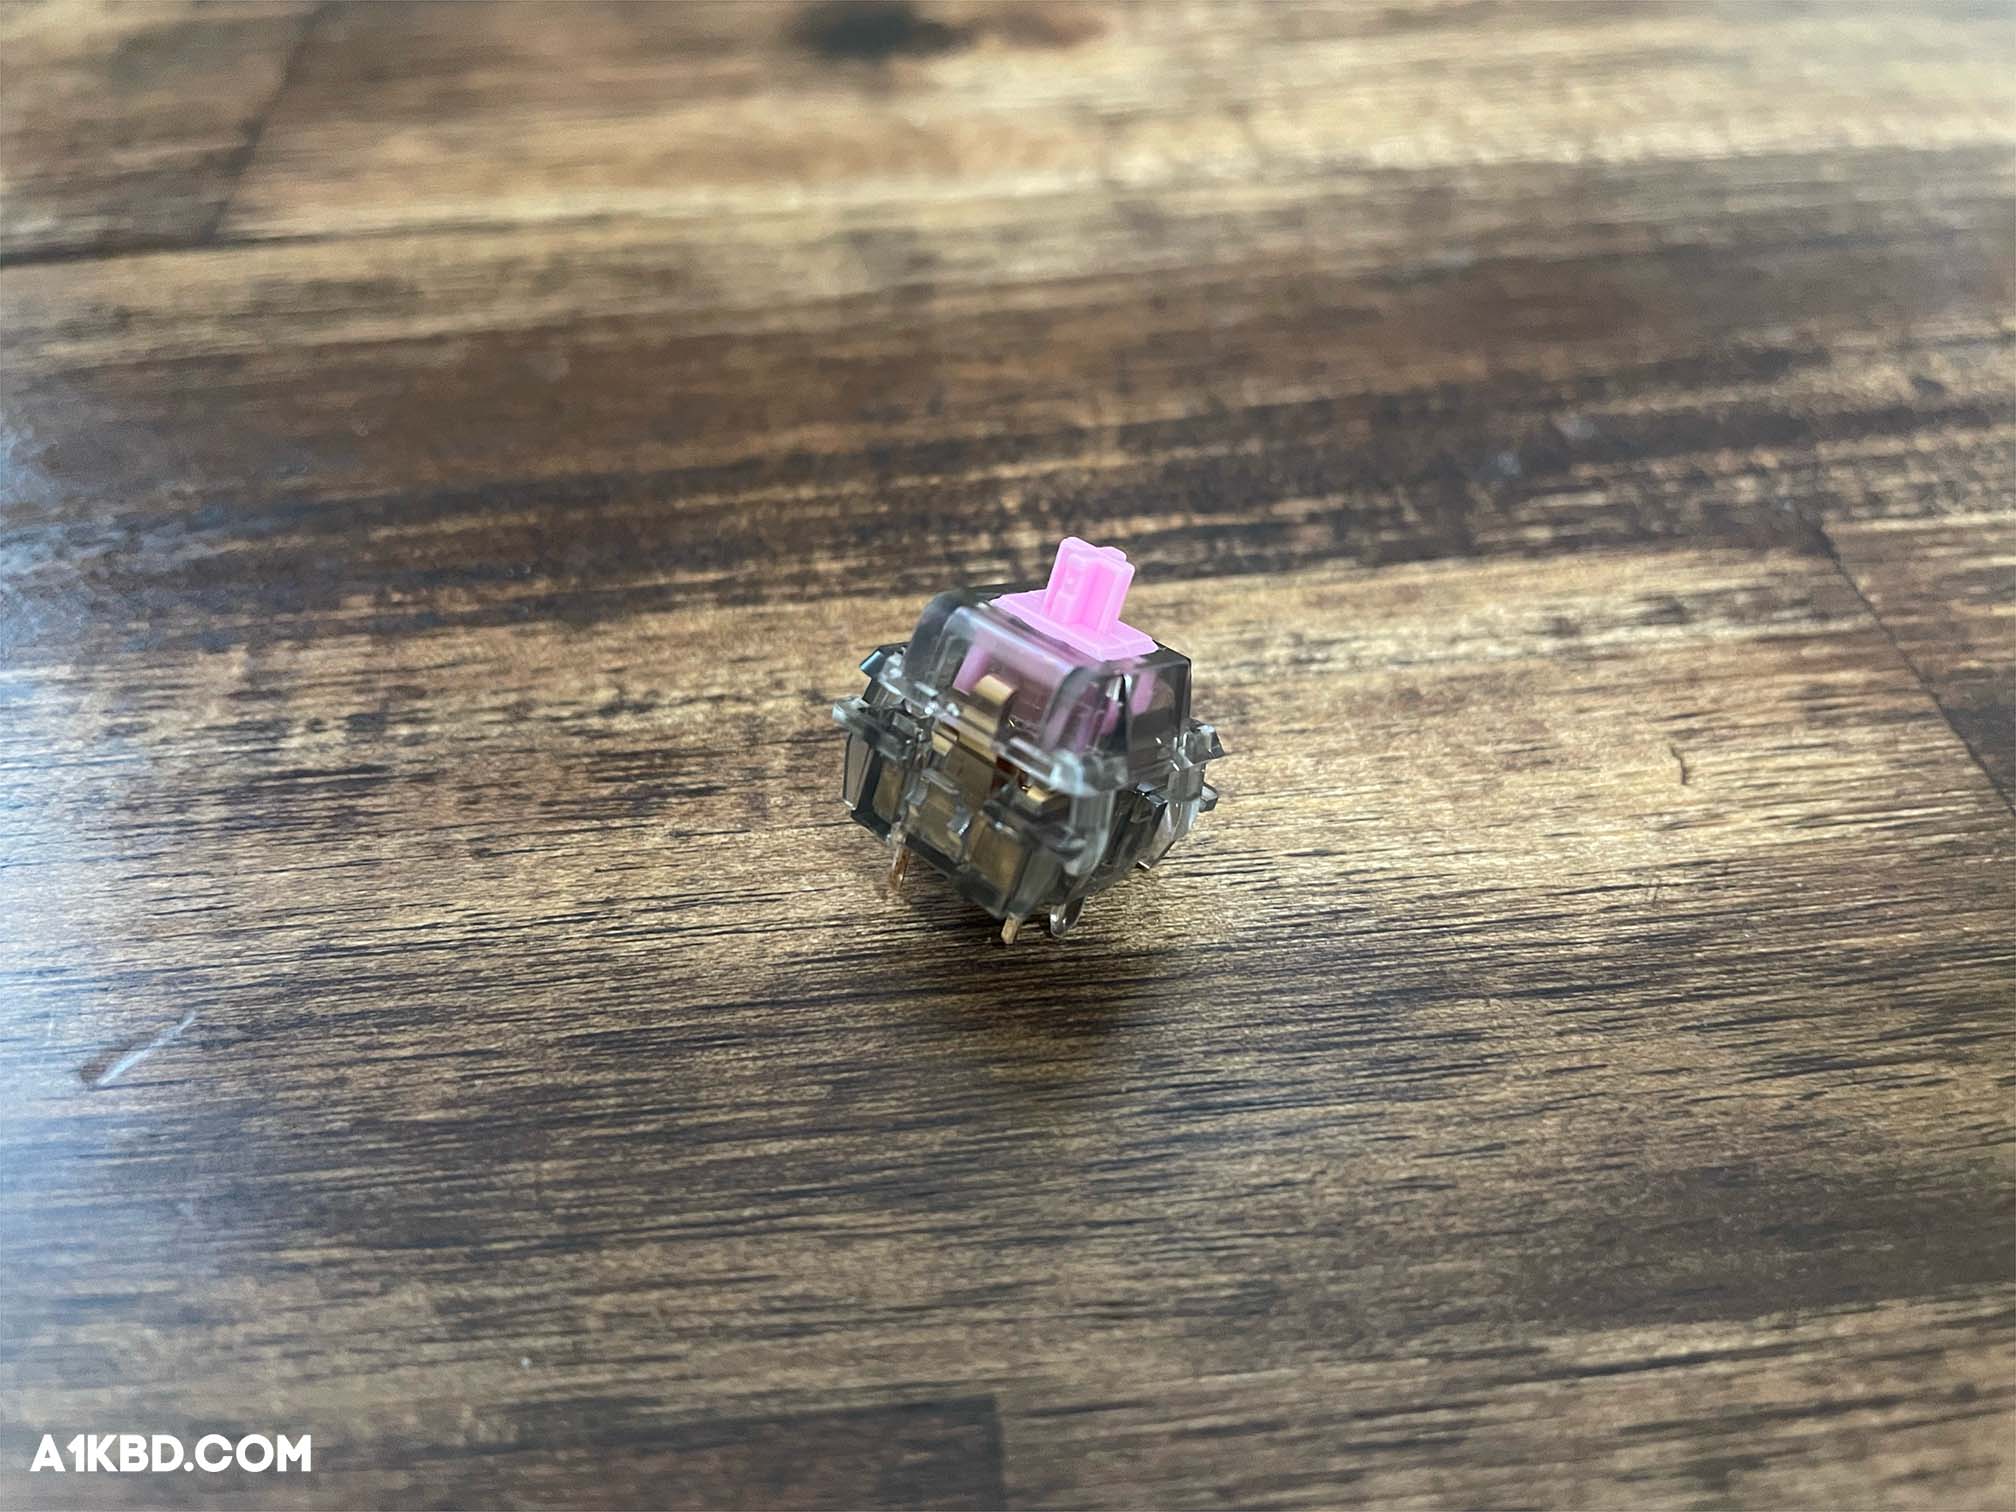
We like to start with the bottom housing since it ties in with the next step. You’ll want to locate the two rails of your bottom housing. Stroke the inside of the rails in an upwards motion three times, then flip the brush and do the same with the other rail. Use any excess lube left on the brush and lightly tap it on the floor of the bottom housing. Next, dip your brush into the center mast and twist it for full coverage. At this stage, you can also lube the leaf if it has ping though avoid this if you are lubing tactile switches. Reference the diagram below to have a more concise idea of what is being discussed.
Step #4. Film the Switch (Optional)
Required Tools: Film, Tweezers
If you chose to buy switch films, this is the best point in the lubing process to film a switch.
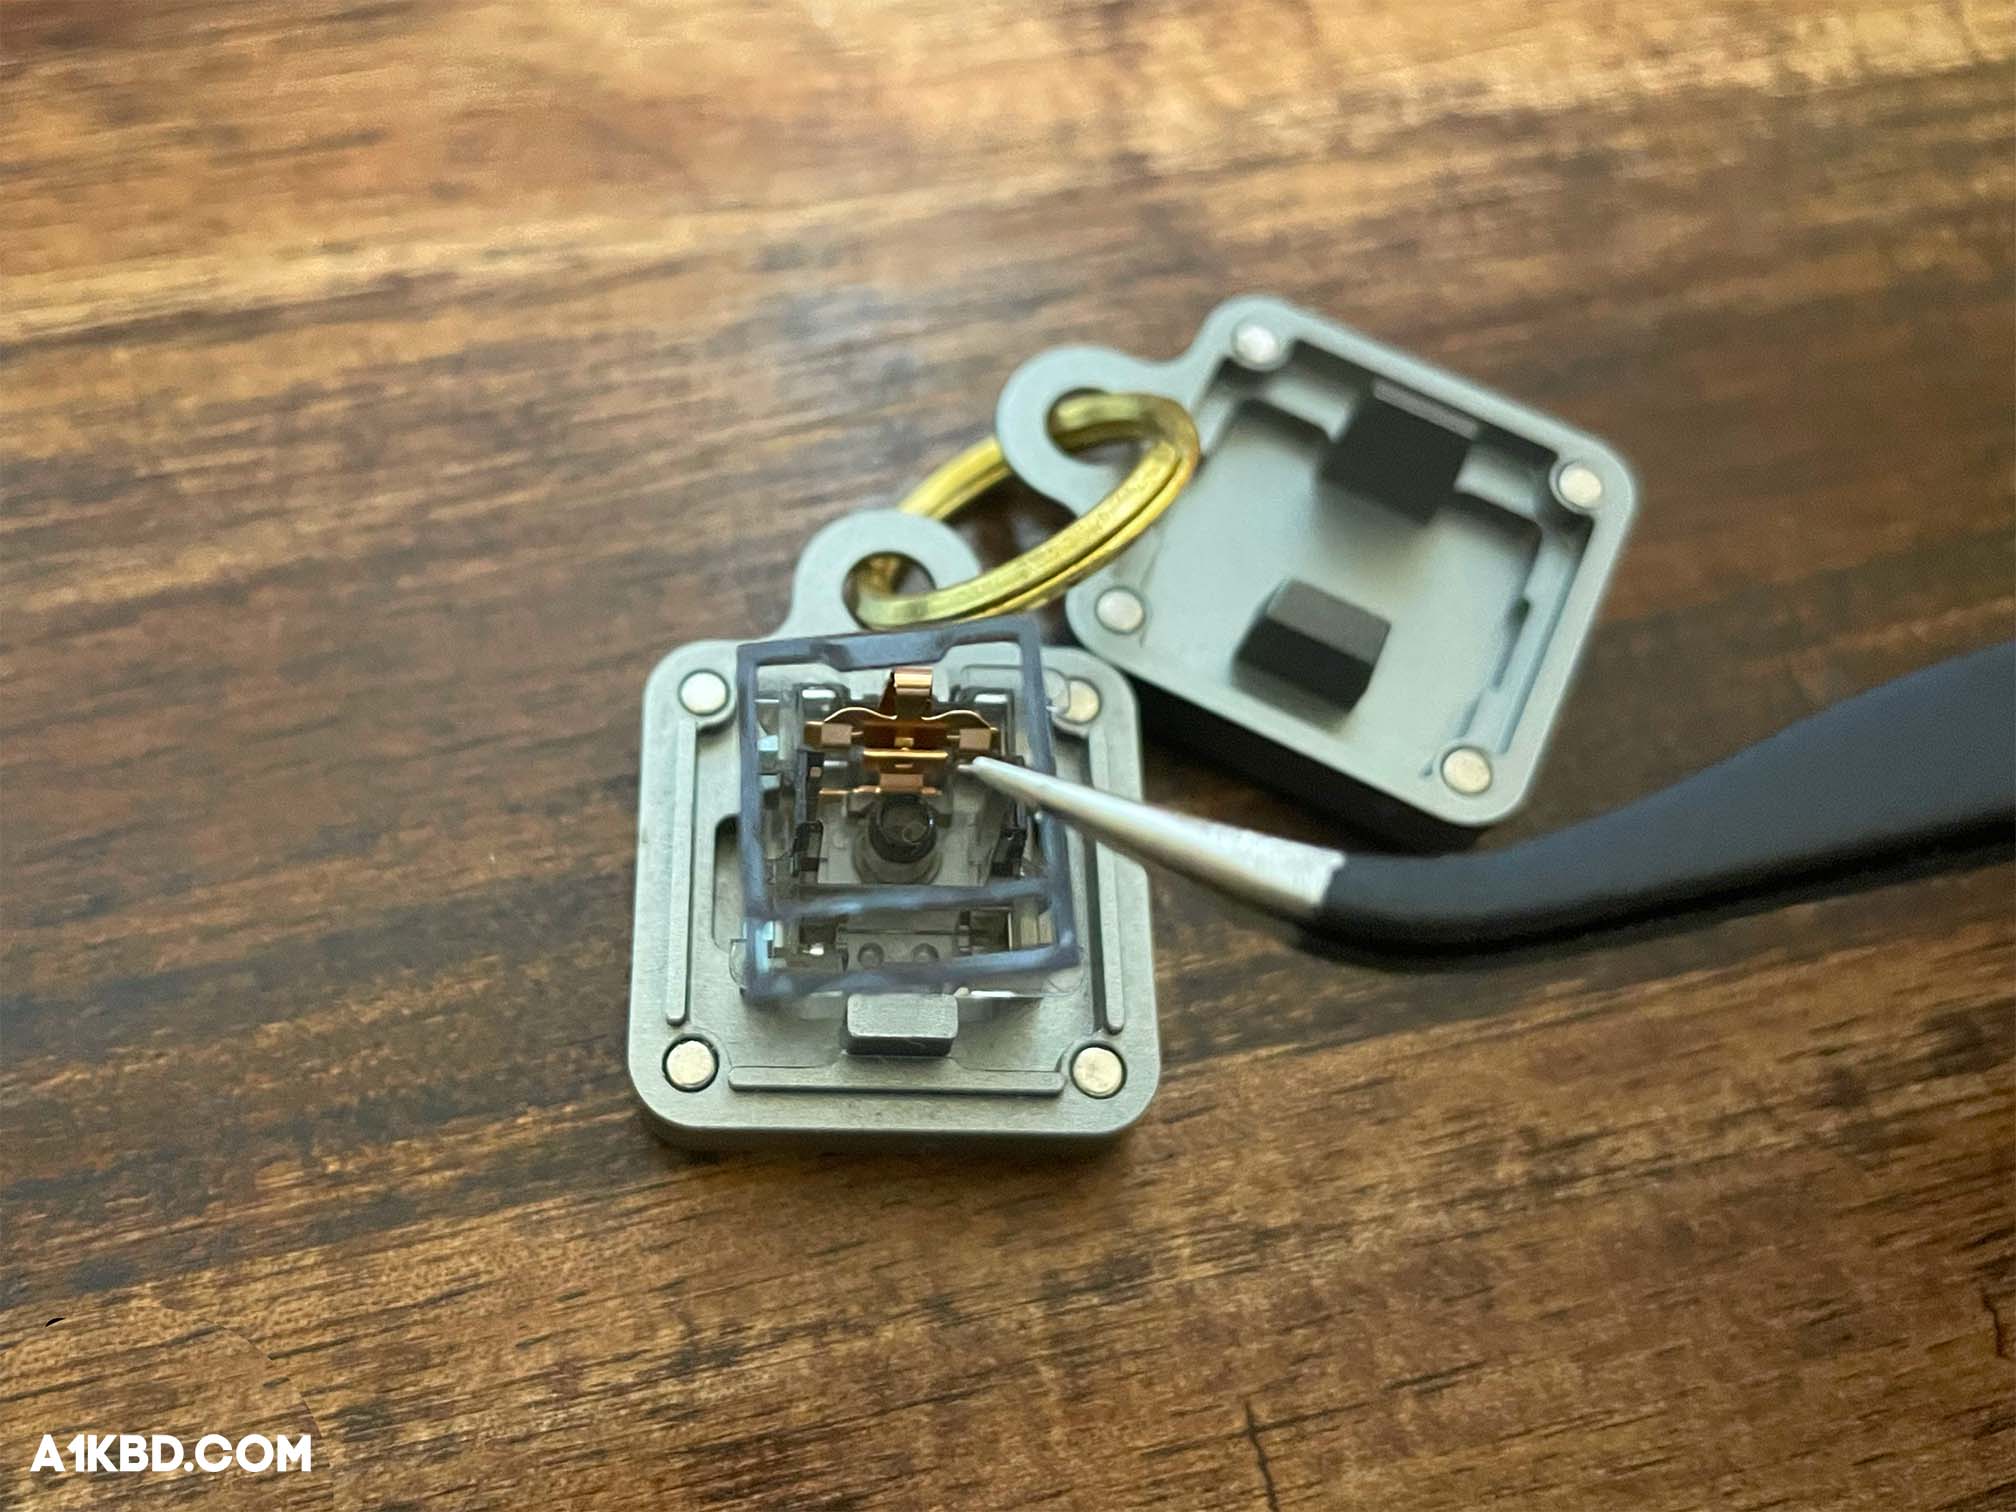
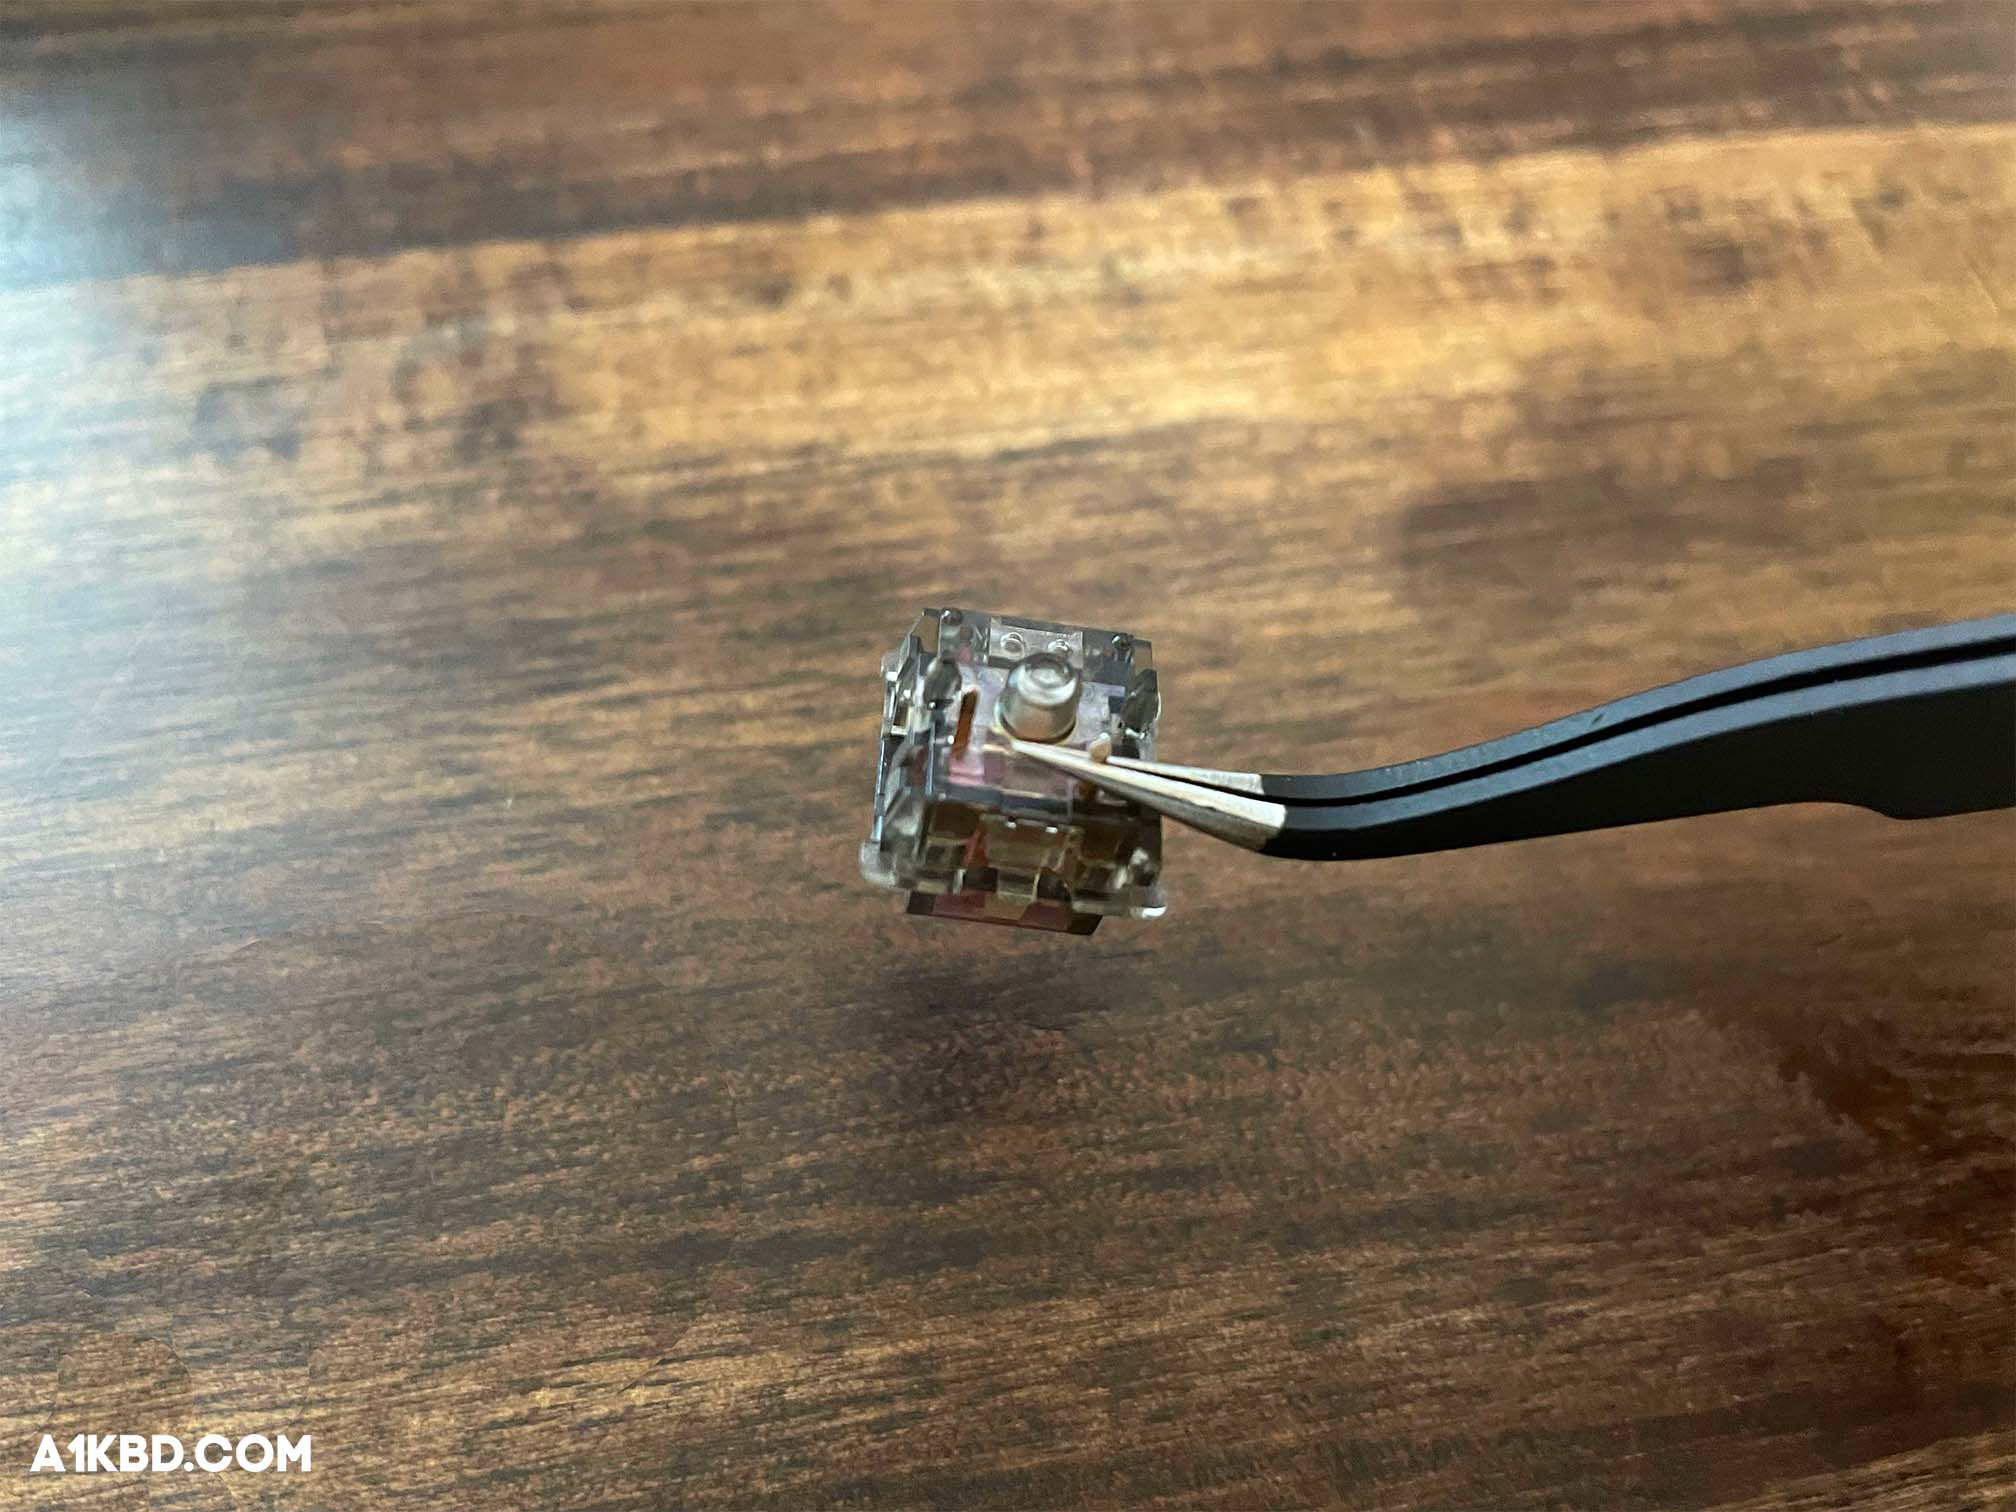
To ensure correct filming, start by carefully and precisely grabbing the end of the film with your tweezers shown below. You’ll see a little tab on your film, then place the film where the tab lines up with the cut-out right above the leaf. The film should wrap around the rails so there is no interference. For more information on filming switches, check out our full guide here.
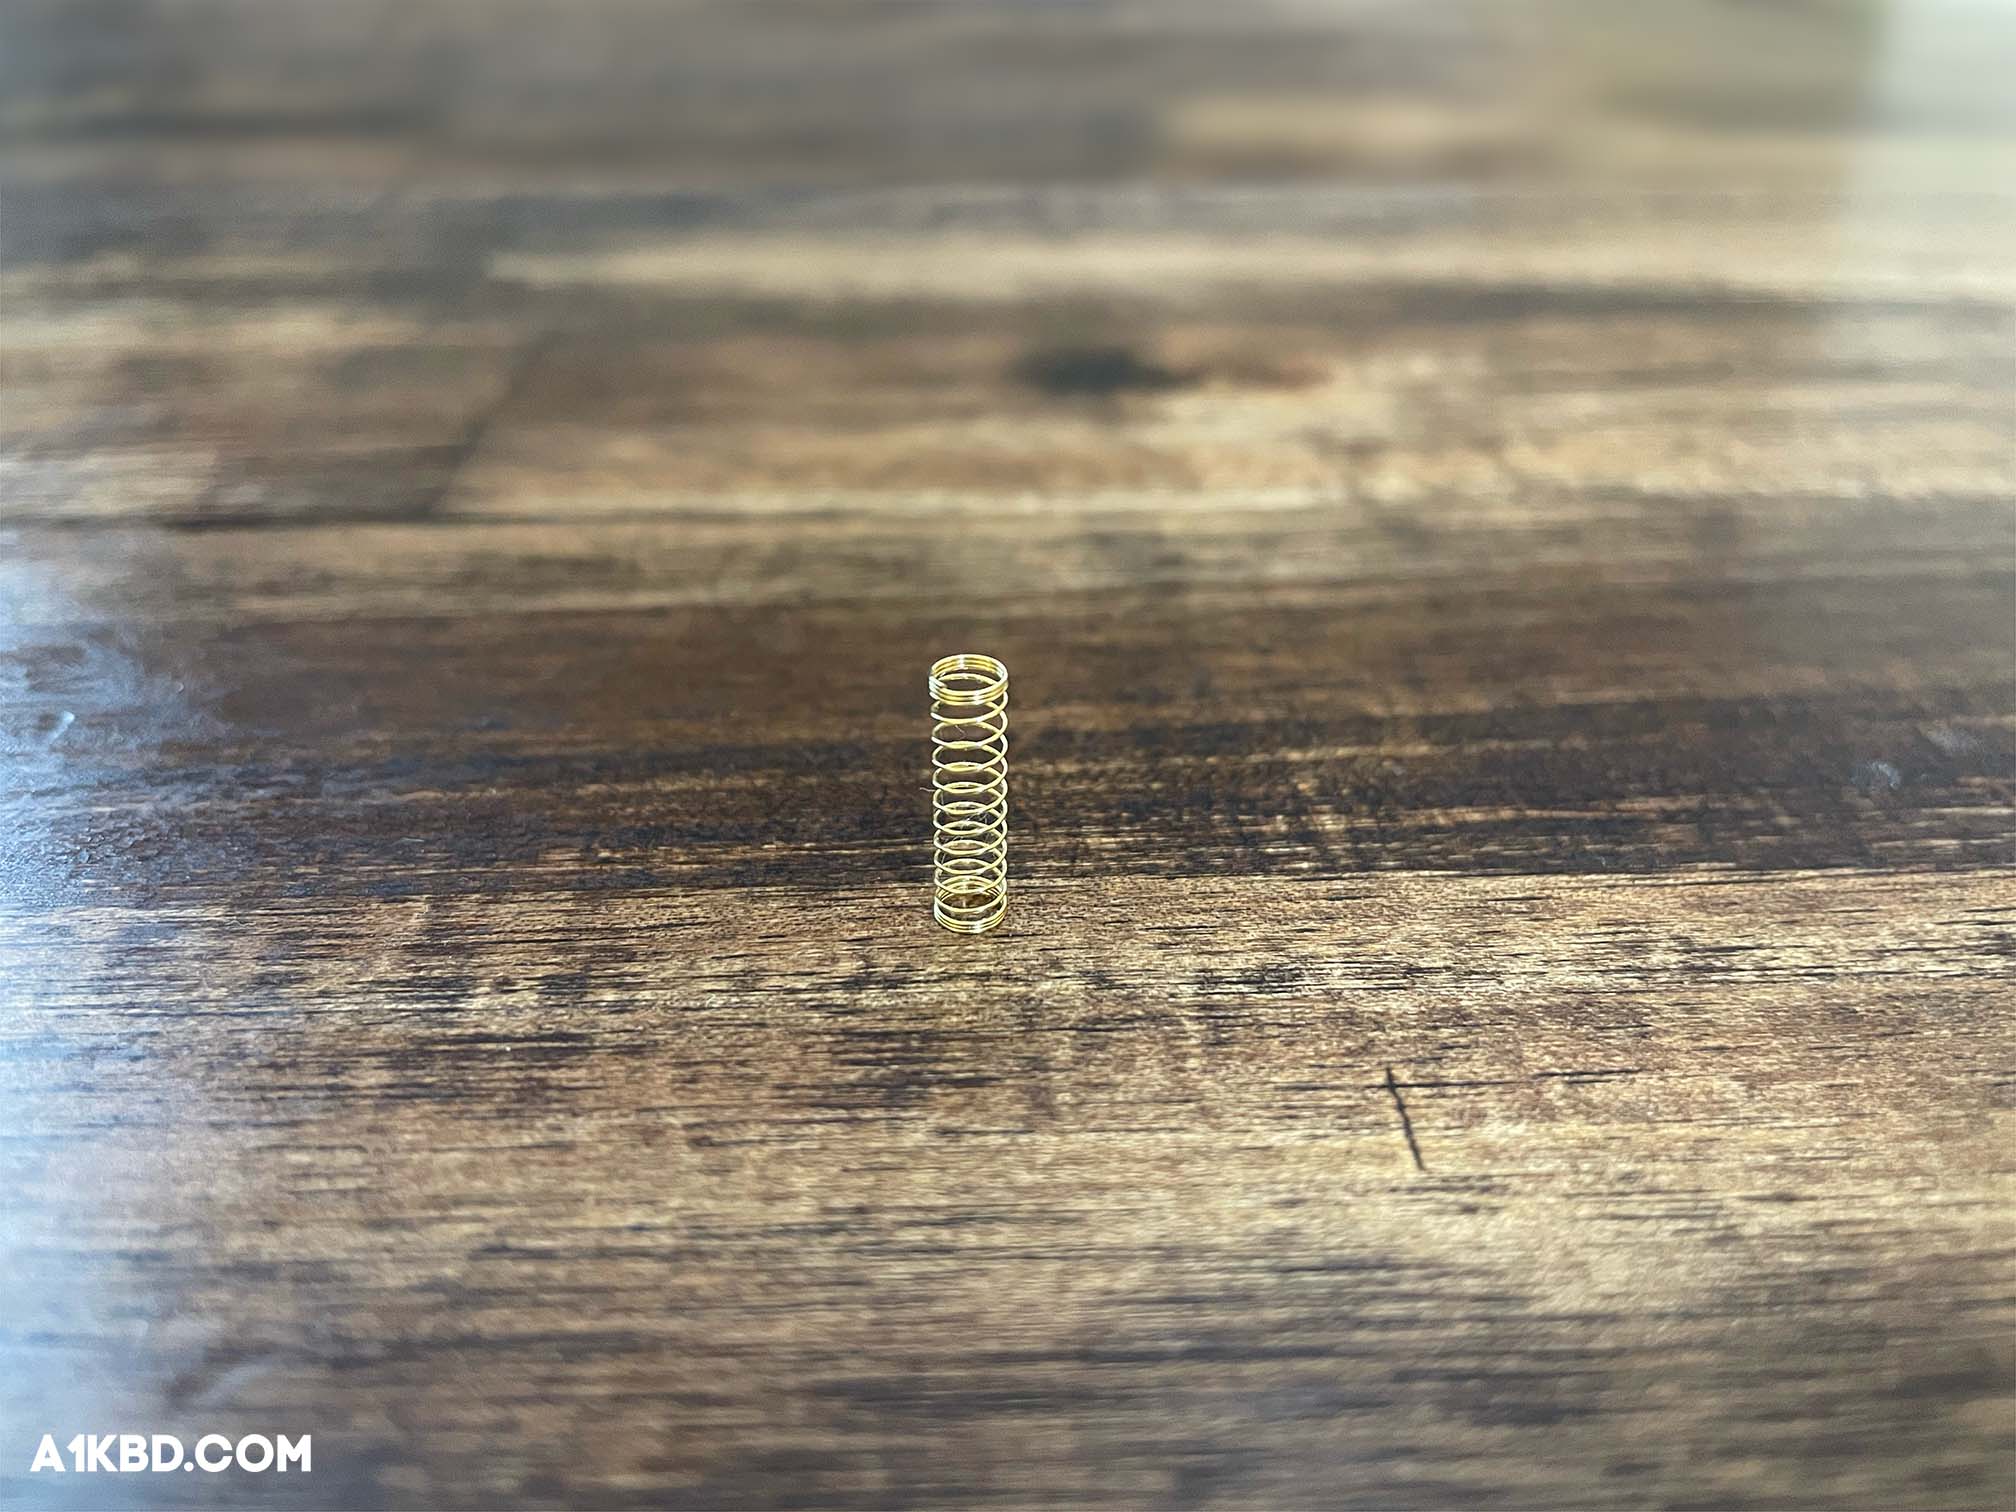
Step #5. Lube the Springs
Required Tools: Lubricant, Brush, Tweezers, Resealable Bag (If bag lubing)
There are 2 ways to lube your spring to successfully eliminate spring ping. The first way is to manually lube each spring. The other way is to bag lube them. Bag lubing is much more efficient and will give you similar if not better results than manually lubing the springs.
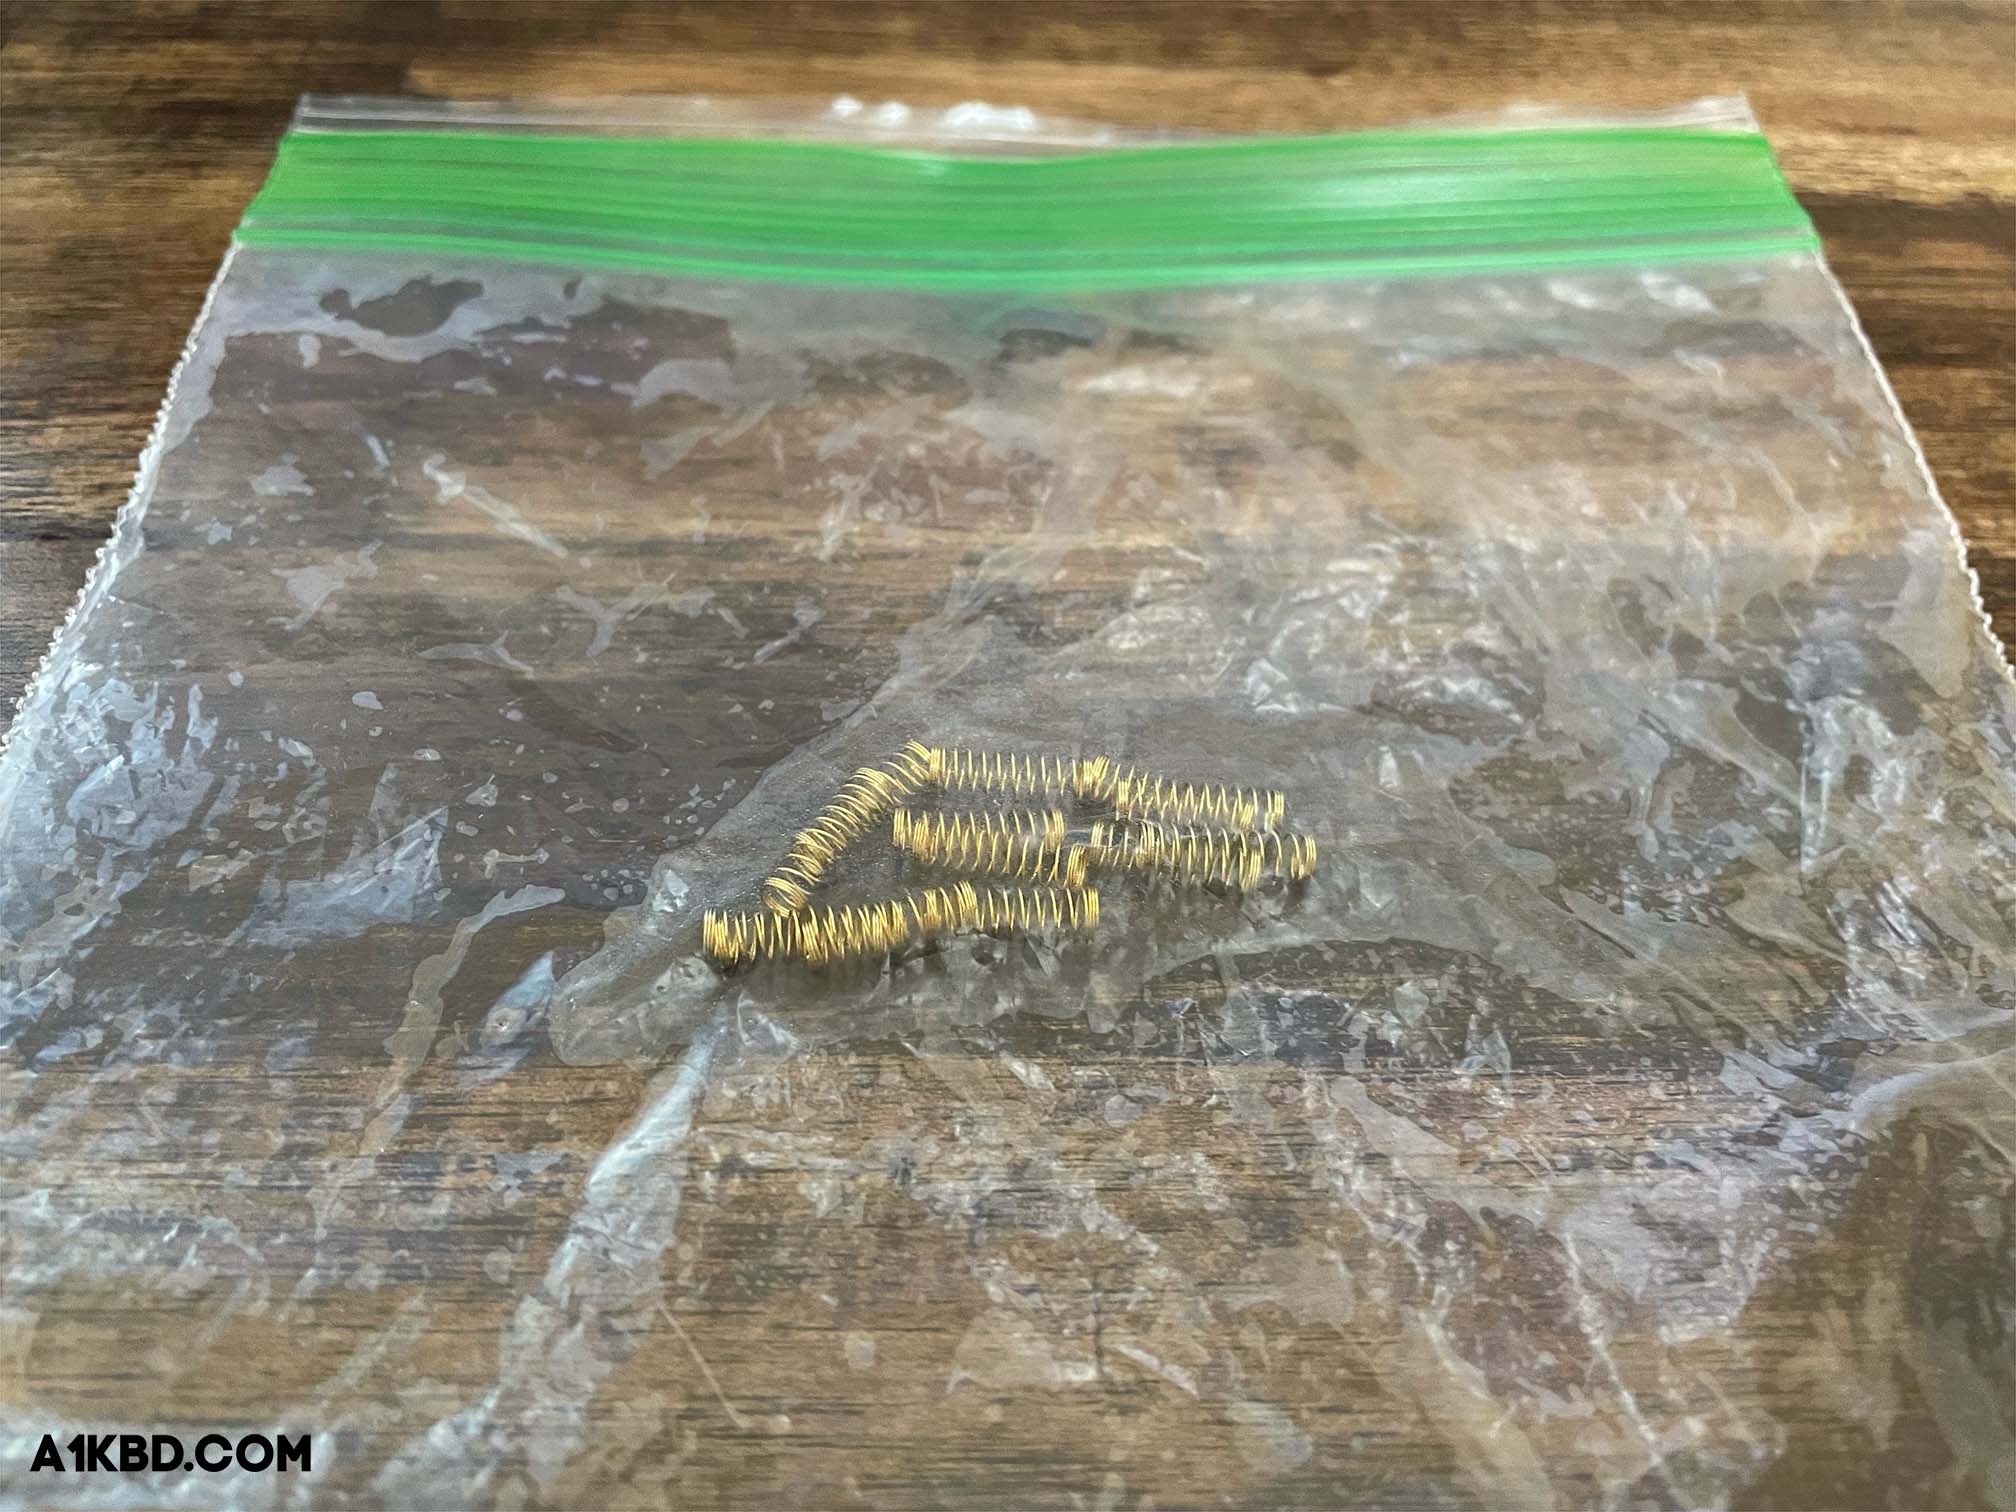
a. Bag Lubing the Springs
1) To bag lube your springs, you will need a bottle of Krytox GPL105 and a resealable bag. Open up the bag and dump all the springs inside. The preferred rule to follow for bag lubing is 1 drop of oil per 10 springs. For example, if you have 100 switches you would add 10 drops of oil. After the oil is inside the bag, seal it though leaving a tiny gap at the end. Blow air into the gap until the bag is inflated, then seal the bag. After that, shake the bag for around 30 seconds.
2) Let the air out of the bag and proceed to reseal it. Massage the switches from the outside of the bag for 30 seconds. This ensures that the springs are evenly coated with oil. You can now open the bag and start to load the springs onto the bottom housings.
3) You can take out your tweezers here to avoid getting lube on your hands. If any springs are tangled, you would have to grab the ends of two tangled springs and twist opposite ways. This untangles the springs without the risk of damaging any.
b. Brush Lubing the Springs
If you choose to not use the bag lubing method, reload your brush with lube to use on the spring. The manual way to lube a spring is to hit the main contact points. Those points are on the top and bottom of the spring. For this step, it’s important to hold the spring with tweezers so lube doesn’t get on your hands. Glide your brush on the end of the spring until you see a thin coat of lube, then do the same with the other end of your spring. Take out your bottom housing from earlier and place the spring onto the center mast.
Step #6. Lube the Stem
Required Tools: Stem holder, Lubricant, Brush
Reload your brush for this step.
Depending on the type of switch you have, there are different ways to lube your stem. The difference between linear and tactile switches is the way the legs on the stem are molded. On linear switches, the legs go straight down causing smooth travel. Though on tactile switches there is a pronounced bump on the legs that causes the switch’s tactility. With linear switches, you could lube the legs and the result will be smoother travel. However, if you lube the legs on tactile switches, the tactility would be dampened harshly if not lost. Nevertheless, you can still lube over the legs on tactile switches if you prefer a lighter bump.
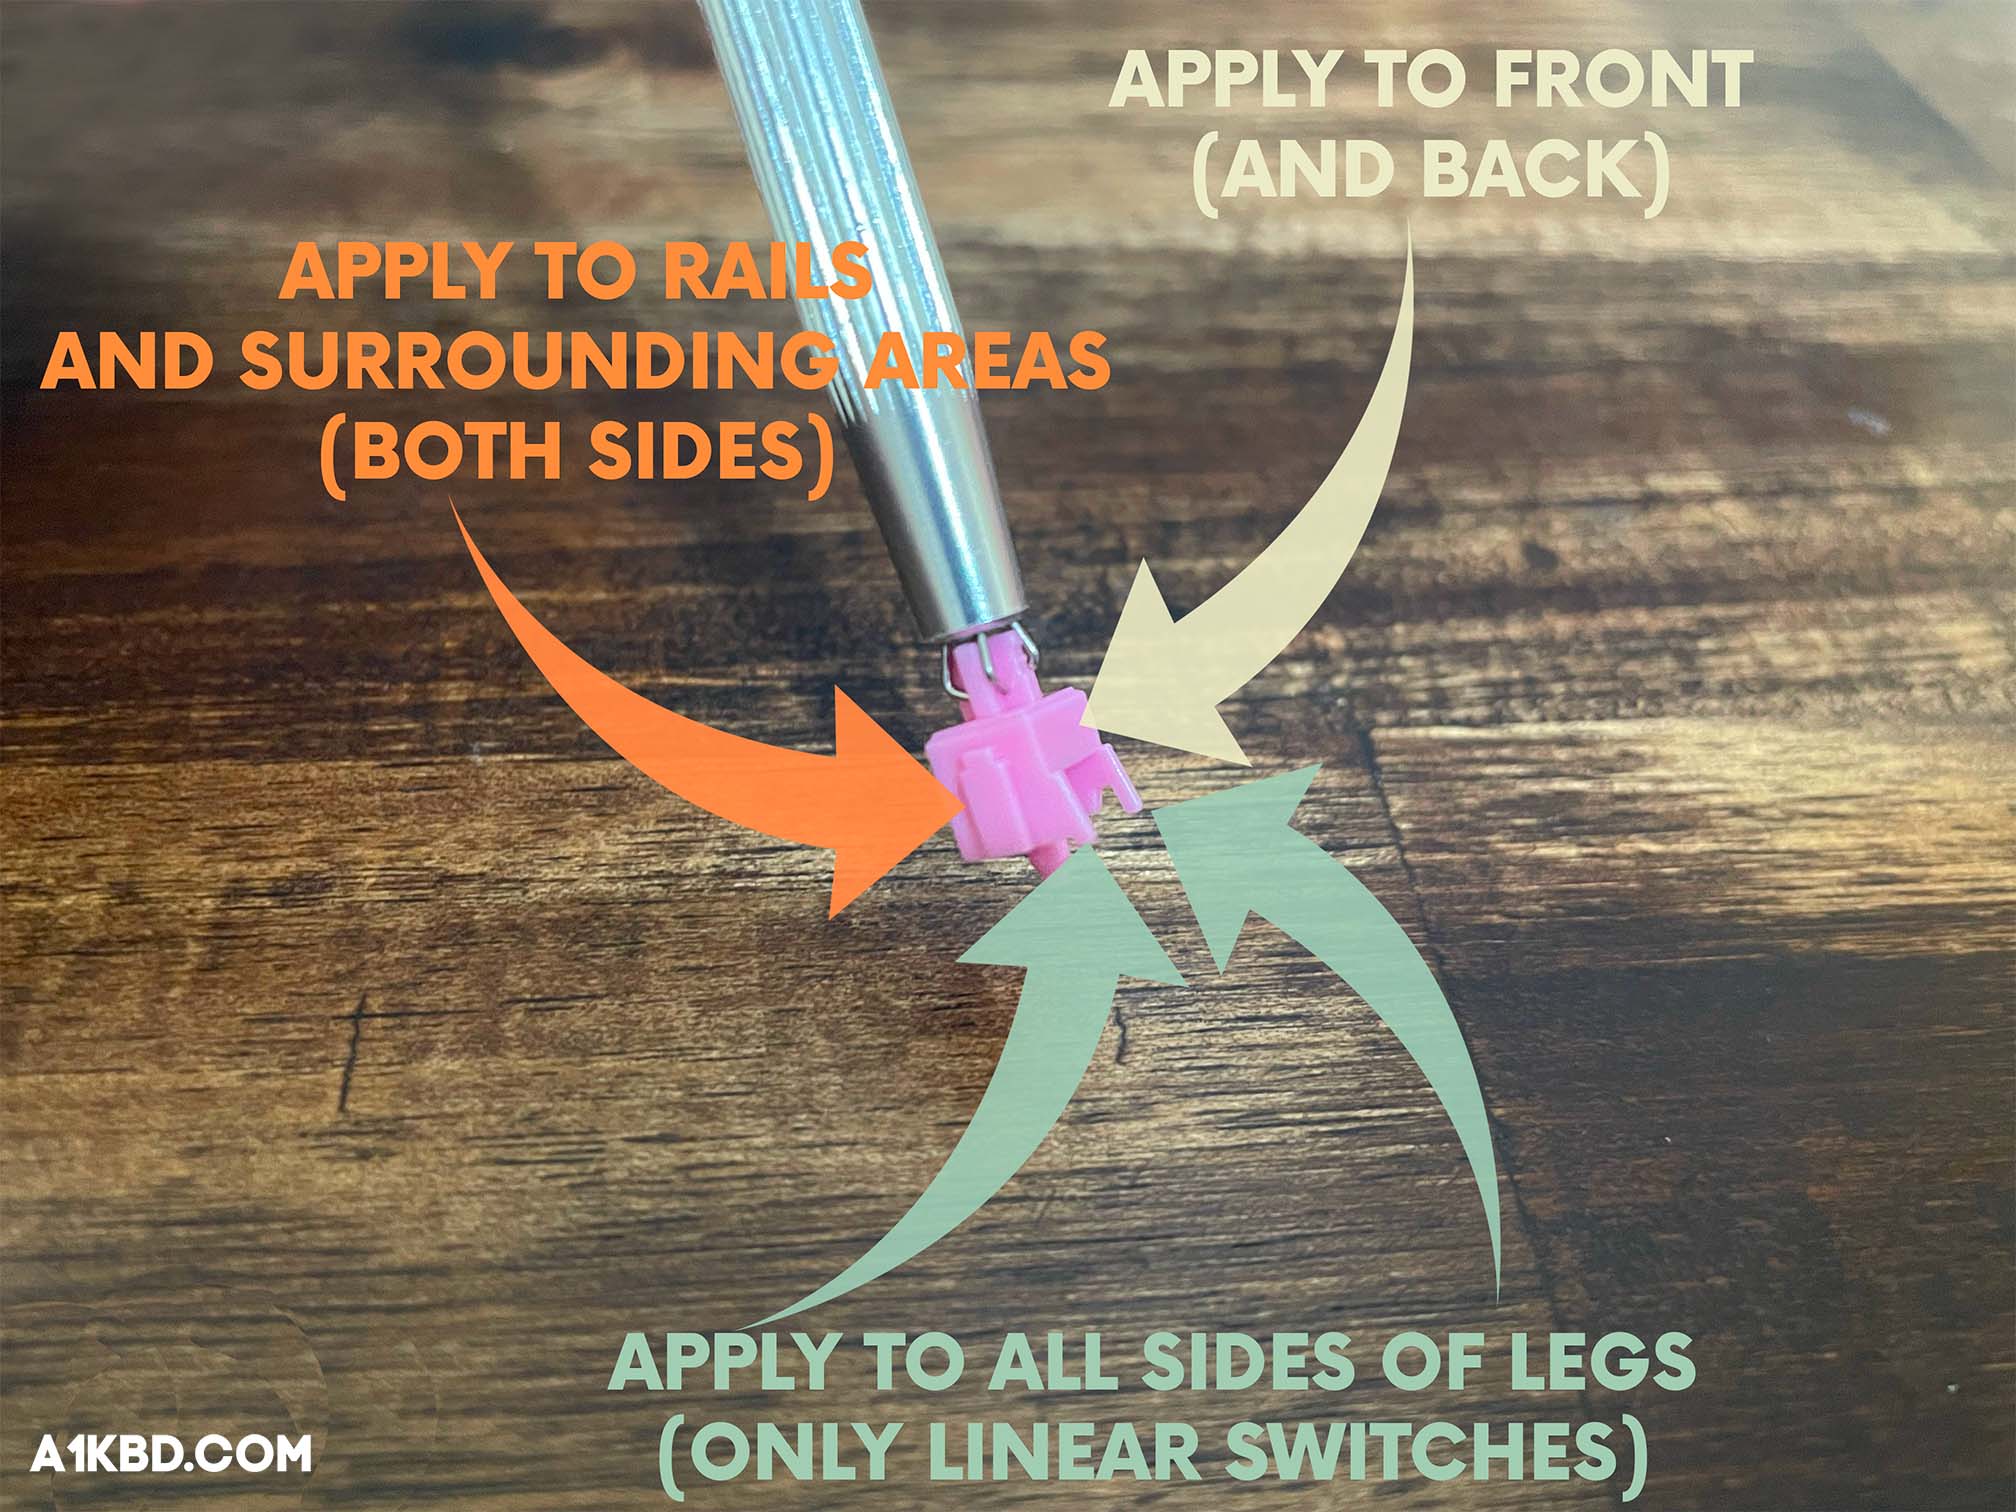
a. Lubing the Stem of a Linear Switch
When lubing the stem of a linear switch, you’ll want to start with the sliders. Start by brushing the entire side of the stem where the slider is located in an upwards brush motion three times. Then flip your brush and do the same with the other side of the stem. After that, it is important to lube the legs of a linear stem. Make sure to cover all sides of the legs since this will increase the overall smoothness of the switch the most. Next, the front and back of the switch need to be coated since they are also important points of contact. That is all there is to lubing a linear stem.
b. Lubing the Stem of a Tactile Switch
A tactile stem shares many similarities with a linear stem during the lubing process. If you do not want to lose tactility, avoid the legs of the stem. You’ll want to start with the sliders first. Cover the whole side of the stem where the slider is located in an upwards motion three times. Next, flip your brush and do the same with the other side of the stem. The other two contact points of the stem known as the front and back are to be covered after that as well. Now you have successfully lubricated a tactile stem.
Make sure to seat the stem onto the spring so the legs face the leaf.
Step #7. Lube the Top Housing (Optional)
Required Tools: Lubricant, Brush
We prefer not to lube the top housing mainly because it makes switches feel a tad over-lubed. Nonetheless, if you choose to do so it’s super simple.
You can use the leftover lube from your stem for this step.
Take out your top housing and locate the indent where the stem rails contact with the top housing. Use two upwards brush strokes for each slider.
Step #8. Reassemble the Switch
Required Tools: A Batch of Lubed Switches
Now it’s time to finalize putting the switch back together. You already have the bottom housing, spring, and stem prepared, so all that’s left is the top housing. The side of the top housing with a hole should face away from the leaf or the switch will not operate properly. Line up the top housing on top of the stem. Then press down on it until you hear the legs clip. Next, check that all four legs are clipped down. If any side has legs that aren’t clipped, apply pressure to that side. Check to see if the switch actuates properly.
Step #9. Test your Switches
Required Tools: A Complete Keyboard, Tweezers (If any pins are bent)
Now that your switches are properly lubricated, it’s time to start inserting the switches into your keyboard. Before you continue, it’s best to check if all the switches work. During the movement of all your switches, some pins could have possibly been bent. We recommend this website to ensure all your switches work. Alternatively, you can use VIA’s built-in key tester.
What do you do if a switch doesn’t work? Don’t worry, this issue is usually caused by a bent pin. However, the problem can be easily resolved. Start by pulling the switch from the socket and locate the bent pins on the underside of the bottom housing. Use tweezers to grab the flat parts of the pin, and simply bend it back into place. Fortunately, switches can easily be fixed and put into working condition again.
Conclusion
Even though lubricating switches can be tedious and time consuming, the process is rewarding and no doubt worth the results. After reading this thorough step by step guide you can say goodbye to scratch, and say hello to new smooth switches. We hope this guide was informative and has given you enough information you need to bring your switches to the next level. This guide will be updated consistently to ensure that it remains as helpful as possible.
Thank you for reading and good luck!